Friday, December 18, 2009

Archimedean Solids Video

Willy Felton of the Community School in Sun Valley, Idaho is a big fan of using SketchUp in math classes. (Read what he thinks here.) He and his students have produced a video to showcase their work, consisting of models made with my book on Platonic and Archimedean solids. I love the addition of 3D Text names on the model displays!


Here's an earlier video he and his students made:


I even like their choice of background music ;-)


Anyone can design anything in 3D! www.3dvinci.net

Email Newsletter icon, E-mail Newsletter icon, Email List icon, E-mail List icon
Join our FREE Email Mailing List!


Logic Puzzle: Building Perspectives

I just uploaded my December SketchUp project to the Math Forum. This is a really neat logic puzzle, in which you start with a grid of "buildings" (or tall boxes).


You show only certain views of the model (front, left, etc.), and compile enough data to figure out which buildings have which height.


It's a little like Sudoku, but much more colorful! It's free, so check it out.


Anyone can design anything in 3D! www.3dvinci.net

Email Newsletter icon, E-mail Newsletter icon, Email List icon, E-mail List icon
Join our FREE Email Mailing List!


Tuesday, December 15, 2009

Creating a Measured Guide Line

Here's something very simple and cool about SketchUp's Tape Measure tool, that many people don't know about. I actually already knew about this feature but forgot, and was reminded again recently when learning how to create a geodesic dome from an octahedron. (BTW, if you're into geodesic domes, I'll be sending out that tutorial in January, to our Project of the Month subscribers!)

Say you want to create a guide line ending at a specific distance, passing through a specific point.

I created a hexagon (with the Polygon tool), and want to find a point that's 4' from the center, passing through one of the corners. Here's what you MIGHT think will work:

Activate Tape Measure, make sure the "plus" sign appears on the cursor (press Ctrl / Option if not), and click the center point. Then click the corner point.

This creates an infinite guide line passing through the two points you clicked. If you then try to size this guide line by typing 4' and pressing Enter, you'll be asked if you want to resize the model.


Clicking Yes would change the hexagon so that the distance between the center and corner is 4' - not what I'm looking to do.

Starting over, here's how to do this: Activate Tape Measure, click the center of the hexagon, then HOVER on the corner point.


Type 4' and press Enter, and here's your guide line.

This entity is actually considered to be a guide point, and not a guide line. So if you right-click on the guide line and choose Entity Info, you'll only see its entity type, not its length. But you could always check its length with the Dimension tool.


This is necessary for creating a geodesic dome because all corners of the dome must be the same distance from the dome's center.


Anyone can design anything in 3D! www.3dvinci.net

Email Newsletter icon, E-mail Newsletter icon, Email List icon, E-mail List icon
Join our FREE Email Mailing List!


Tuesday, December 8, 2009

What's in the Upcoming December Projects

For subscribers to our Projects of the Month, December will be a fun month. If you haven't already signed up, now's a great time - you can look them over during your winter break, while skiing in the Alps, sunbathing in Barabos, or staying home like me.

Calculating Length and Area

Teachers always ask about using SketchUp as a calculation tool. Length and area are no problem; this months' project shows you how to find lengths of one or more edges, area of one or more faces, and how to work with curved edges and faces (which can be tricky).


(SketchUp can't do volume calculations on its own. However, check out this blog post about a volume-calculating plug-in.)

Build a Snowman

We already had one (minor) snowfall here in DC, and they're calling for more tomorrow (ugh). So in honor of weather that kids love (parents, not so much), one of this month's projects shows how to create a snowman. You'll learn how to create and copy a sphere, and how to find accessories in the 3D Warehouse.

You can make a simple, standard snowman, or a weird, funky, or even scary one.


Opposite Colors

Everyone knows this optical phenomenon - you stare at something for several seconds, then look away. What you'll see for a couple of seconds is the same image, in opposite colors. This project will show you how to change a model's colors so that you can try this trick yourself. For example, the model on the left becomes the one on the right, and vice-versa.


As another example, here's the US flag in its opposite colors:


In case you missed it, here's where you can sign up.


Anyone can design anything in 3D! www.3dvinci.net

Email Newsletter icon, E-mail Newsletter icon, Email List icon, E-mail List icon
Join our FREE Email Mailing List!


Friday, December 4, 2009

SketchUp Sculpture Exhibit

More SketchUp and art!

A sculptor named Stephanie Syjuco mined the 3D Warehouse for some simple, colorful SketchUp "sculpture" models. She placed them in a SketchUp exhibit (with Bryce in the middle of the room).


She then fabricated the actual models by hand and arranged them in an exhibit.


It's a great concept - she borrowed the work of others, probably all of them non-artists, who were just playing and experimenting with SketchUp. She then brought them these models to life.

I'm not sure if any of the modelers know their work is being displayed in this gallery in Ireland, but how cool would it be to someday stumble upon something you designed?


Anyone can design anything in 3D! www.3dvinci.net

Email Newsletter icon, E-mail Newsletter icon, Email List icon, E-mail List icon
Join our FREE Email Mailing List!


Thursday, December 3, 2009

Plug-In: Calculating Volume in SketchUp

SketchUp can tell you the length of selected edges, or area of selected faces. (This is one of the three topics covered in our December Projects of the Month).

But I'm often asked if SketchUp will also calculate volume. The answer is no within SketchUp itself, but there is a plug-in that does it. It's called "Volume Calculator" (how did they come up with that name?), and one place to find it is here. As with any plug-in, once you save the RB file, place it in your "Plugins" folder within your SketchUp installation, and restart SketchUp.

Volume Calculator works great for simple, clean geometry, but a bit less well for complex models. Here's what I did with it:

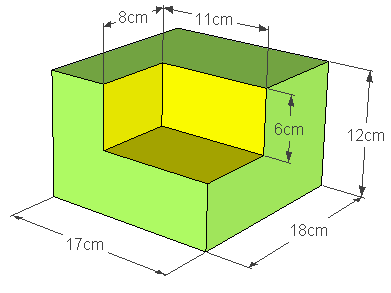
I created a box with a smaller box cut from one corner. Its volume is
(12 x 18 x 17) - (8 x 11 x 6) = 3,144 cc.


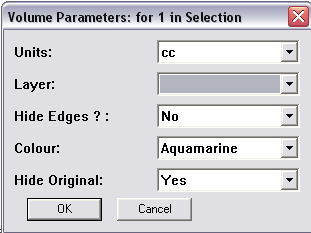
To get the volume, you need to first make the object into a group or component. Then right-click on the group / component and choose Volume. In the window that appears, select your units (cc in my case), whether to hide edge in the new object that will be generated, the color of this new object, and whether to hide the original. Then click OK.


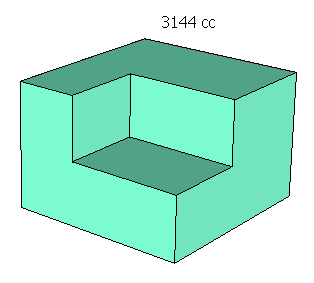
My original box was hidden and a new aquamarine one appeared in its place. I hid the dimensions to better see the the calculated volume, which was added to the new object as a text string: 3144 cc. (The original object is still there, just hidden.)

Circular objects present an interesting problem, because circles are actually segmented polygons. So you might not get exactly the results you expect. For example, here's a truncated cone (aka conical frustum), whose volume =


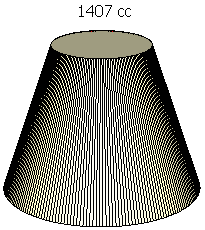
If the circles were "true" circles, the volume would be 1407.43 cc.


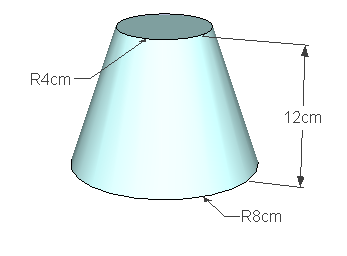
But the circles have 24 segments, so the calculated volume shown below is a little off. Also, the new object is created showing its segmentation.


I tried the same object again, this time starting with a base circle of 200 sides. This time the result was almost exactly correct.

Volume Calculator sometimes chokes on a model that's not completely straightforward, like a cylinder with a cylindrical hole.

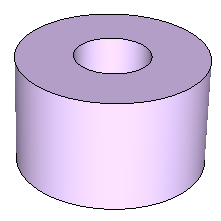
So if you have something like this, you might want to try breaking the calculation into two separate models, then subtracting.

If you teach math, this plug-in could become an essential addition!


Anyone can design anything in 3D! www.3dvinci.net

Email Newsletter icon, E-mail Newsletter icon, Email List icon, E-mail List icon
Join our FREE Email Mailing List!


Sunday, November 22, 2009

Symmetry of Fall Leaves

My free November project for the Math Forum is up. It involves using a photo of a leaf, tracing around half of it, and investigating the overall symmetry of the leaf. By combining the leaf models you get from a few different photos, you can create a nice collage of colorful leaves.


You can also use rotational symmetry to create a nice wreath.

This is a nice project for math students, but it also can be used in art and science classes. Enjoy!


Anyone can design anything in 3D! www.3dvinci.net

Email Newsletter icon, E-mail Newsletter icon, Email List icon, E-mail List icon
Join our FREE Email Mailing List!


Tuesday, November 17, 2009

Waybe: SketchUp Models to Paper

Those who have subscribed to my SketchUp Projects of the Month since September got my project on how to take a simple SketchUp model and unfold it, in order to create a paper model. (If you're a subscriber who signed up after September, email me and I'll send you this PDF.)


Today I looked at a plug-in that does this unfolding for you, called Waybe.

Waybe can take a simple or complex SketchUp models, and unfold it into a printer-friendly format, maintaining all of the model's colors and materials. It's not exactly a one-click operation; for anything complex you need to divide your model into groups which get unfolded one at a time. (This is actually a good thing: it requires you to think and plan which sections of the models should be separated.) Waybe also includes fold tabs; very helpful.

On Waybe's home page you'll see this cool example of a tank model in SketchUp and its 3D paper model:


Teachers: there is an educational version of Waybe available for $80. But check out this page - it looks like they are having a promotion where you can get this version for FREE during the 2009-2010 school year. What a no-brainer!

If you've used a similar plug-in for creating paper models, let me know! I'm looking at Pepakura next...


Anyone can design anything in 3D! www.3dvinci.net

Email Newsletter icon, E-mail Newsletter icon, Email List icon, E-mail List icon
Join our FREE Email Mailing List!


Monday, November 9, 2009

Upcoming November SketchUp Projects

On November 15th, subscribers to our Projects of the Month will be getting a fantastic batch of projects! If you haven't signed up, what are you waiting for? You get 36 projects (3 per month for 12 months) for $36 - that's $1 per project. A no-brainer, IMO.

Here's what's on tap for November:

American Flag

This project has it all: a bit of math, valuable lessons in spatial thinking and planning, and use of color and components. You start with a schematic drawing of the American flag, and create its geometrically accurate SketchUp model.


Cutout from a Photo

If you've ever wanted to jump into a SketchUp model, here's the next best thing. All you need is a digital photo, and you can create a "cardboard cutout" component to stick in any model. Bonus: this cutout always faces you, so it doesn't look like it's 2D.


Cube Nets

I've worked with a lot of geometry teachers lately, and this is just the sort of thing they want to see. A cube can be "unfolded" into 11 nets. This project will show how to find all 11 distinct solutions, but you don't have to share the answers with your students till they've tried it themselves.


Feedback on our past projects was incredibly positive; I'm excited to see how these projects go over! Again, here's the link to sign up.

Anyone can design anything in 3D! www.3dvinci.net

Email Newsletter icon, E-mail Newsletter icon, Email List icon, E-mail List icon
Join our FREE Email Mailing List!