JS Move, by Jan Sandstrom of Pixero, is a neat plugin that enables you to move one or more objects by using the arrow keys, rather than the Move tool. It's useful for tweaking an object's location - adjusting it a little this way and a bit that way - which would take MANY more clicks with the Move tool.
Get the plugin here (and feel free to check out Jan's other plugins). It's a small RB file which should be placed in your Plugins folder where you've got SketchUp installed. If you open this RB file in a text editor, you can see some instructions listed.
In SketchUp, JS Move will appear in the Plugins menu. You can set up a shortcut key for it, in the Shortcuts page of the Preferences window. I defined Alt+M as the shortcut.
Here's how I used JS Move:
I made a room with a few windows, sofa, and coffee table, then brought in a rug and placed it in the corner of the room. I used JS Move to center the rug with respect to the coffee table. (Note that this example has edges turned off - this would also make the Move tool harder to use since edges aren't available to click on.)
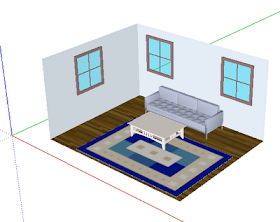
I selected the rug, then activated JS Move (Plugins / JS Move). For the move distance I entered 1 (for one inch) and pressed Enter.
The rest of the work is done by the arrow keys. I used the left key to move the rug to the left (left and right arrows move along the red axis). Pressing the Shift key increases the move distance by a factor of 10 (10" in my example), and pressing Ctrl or (Cmd on the Mac) reduces the distance to 10% (0.1" in my example). You can change the move distance by entering a new number.
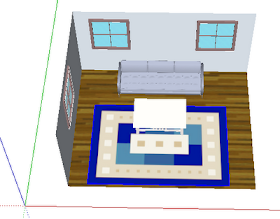
I then orbited around to a different view, and used the up and down arrows to move the rug further into the room (these keys move in the green direction).
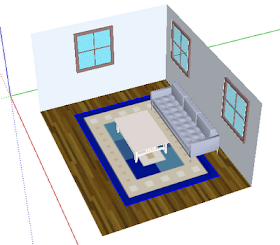
To move objects vertically (along the blue axis), use the Alt key. For example, I selected all three windows and used the Alt key to tweak the windows a bit down along the wall.
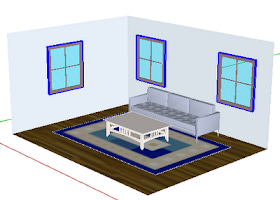
One thing that was pointed out by SketchUp Plugins Reviews: If you have multiple objects selected and use the Shift or Ctrl/Cmd modifier keys, you might get unexpected results related to relative distances between objects.
Give it a try!
Anyone can design anything in 3D! www.3dvinci.net
A source of info for people interested in 3D design and its applications for education and for design pros.
Thursday, March 25, 2010
SketchUp Materials and Textures Galore
The material collections (wood, stone, tile, etc.) that come with SketchUp are pretty sparsely populated. But there is a wealth of materials you can add to your collections, all for free.
One easy way to add materials to each collection is to download the "Materials Bonus Pack." The pack for SketchUp 7 is listed as "coming soon" (and has been that way for a while), but you can use the materials provided for SketchUp 6. It's self-installing - the materials will be loaded into the proper folders - just make sure you change the default SketchUp 6 installation folders to SketchUp 7.
The 3D Warehouse is another great place to look. You can use search terms like "material pack," "texture collection," "seamless fabrics," etc. Most of the models you'll find contain simple painted rectangles, such as this one (clicking the graphic below will open the model's page in the 3D Warehouse):
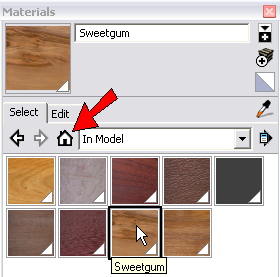
When you download and open a model like the one above, the Materials window (Colors window on the Mac), will show all of the materials in the "In Model" folder.
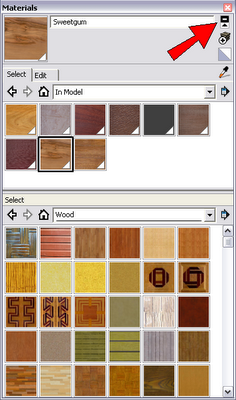
PC users: if you want to add some or all of these wood materials to your "Wood" folder, just click the icon shown below, which adds a second pane to the window. Set one of the panes to "Wood" and drag and drop the materials from "In Model."
Mac users: Drag the materials you want to save into the little color wells at the bottom of the Colors window. Then open the folder where you want to add these materials, and drag them up from the wells.
A lot of manufacturers have their own material collections in the 3D Warehouse. For example, there are paint swatches by Sherwin Williams:
Countertop swatches by Corian:
And lots of tiles:
It's nice to have options!
Anyone can design anything in 3D! www.3dvinci.net
Tuesday, March 23, 2010
SketchUp Pro is Cheap (or Free) for Schools
Yesterday I sent out my March newsletter for educators (if you don't subscribe, use the "Join Our Mailing List" link below). One of the topics was about getting SketchUp Pro (which includes LayOut) for either cheap or free, when used by teachers or students.
Why would schools need Pro? LayOut is a great student tool; it provides an easy and fun way to present your models and designs. And some schools have rather sophisticated CNC machines or other CAD apps, and would need the import / export options available only in Pro.
One of the resellers who provides student and teacher Pro licenses is Creation Engine, and Charles Lai from CE emailed me their academic pricing:
I haven't checked with other resellers, but here's where you can find a list of companies who provide Pro licenses to schools. I imagine their prices are comparable.
Anyone can design anything in 3D! www.3dvinci.net
Why would schools need Pro? LayOut is a great student tool; it provides an easy and fun way to present your models and designs. And some schools have rather sophisticated CNC machines or other CAD apps, and would need the import / export options available only in Pro.
One of the resellers who provides student and teacher Pro licenses is Creation Engine, and Charles Lai from CE emailed me their academic pricing:
- Google SketchUp Pro 7 is available at a student discount price of $49.
- Google SketchUp Pro 7 is free for instructors.
- Google SketchUp Pro 7 Lab licenses are available at a school discount price of $15.
I haven't checked with other resellers, but here's where you can find a list of companies who provide Pro licenses to schools. I imagine their prices are comparable.
Anyone can design anything in 3D! www.3dvinci.net
Monday, March 22, 2010
Isosceles Triangles on the Math Forum
Wow, it's been a couple of weeks since I've blogged - I've had a busy March. Lots of travel: some personal and some for work. (I was in Western New York last week for student and teacher workshops - much fun!)
Anyway, back to my normal routine (whatever "normal" means):
My March project for the Math Forum is ready, and it's about creating right isosceles triangles and assembling them to form a square. The work is done using only a few, simple SketchUp tools, and you'll also explore the relationships between edge lengths and areas of adjacent triangles.
I got the idea for this project after finding this video on math teacher Bill Lombard's website. He presents a way to assemble 7 triangles into a square, but you can have any number, as long as the triangles follow the correct pattern.
This project has both a teacher version and student version. Enjoy!
Anyone can design anything in 3D! www.3dvinci.net
Monday, March 8, 2010
Our Awesome March Projects
Here's what's on the menu for March 15, when subscribers will be getting their SketchUp Projects of the Month. If you've been debating about whether to sign up, it's only $36 per year, and each month you get 3 projects. (If you don't like math on Mondays, that comes out to a mere $1 per project!)
Build a Fluted Column
Apparently a lot of teachers are talking to students about ancient Greek and Roman architecture, because I've gotten a surprising number of requests for this project. You'll learn how to build a column with a specific number of circular flutes, and how to maximize efficiency by taking advantage of components. This project also involved the very fun Follow Me tool.
Model an Aquarium with a Photo
The tank in the model below was painted using a single digital photo I found on the Internet. This project will show you how to position a texture using the "free pins" technique, and how to "wrap" a picture around multiple faces.
Flower Mosaics
You can make interesting and colorful mosaics just by using two SketchUp tools: Circle and Rotate. This project will show how to make a bunch of these, and how to make up your own patterns. You'll also learn about the valuable skill of pattern recognition and repetition.
Once again, here's the link to sign up for SketchUp Projects of the Month.
Anyone can design anything in 3D! www.3dvinci.net