Sunday, November 22, 2009

Symmetry of Fall Leaves

My free November project for the Math Forum is up. It involves using a photo of a leaf, tracing around half of it, and investigating the overall symmetry of the leaf. By combining the leaf models you get from a few different photos, you can create a nice collage of colorful leaves.


You can also use rotational symmetry to create a nice wreath.

This is a nice project for math students, but it also can be used in art and science classes. Enjoy!


Anyone can design anything in 3D! www.3dvinci.net

Email Newsletter icon, E-mail Newsletter icon, Email List icon, E-mail List icon
Join our FREE Email Mailing List!


Tuesday, November 17, 2009

Waybe: SketchUp Models to Paper

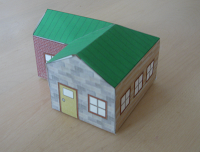
Those who have subscribed to my SketchUp Projects of the Month since September got my project on how to take a simple SketchUp model and unfold it, in order to create a paper model. (If you're a subscriber who signed up after September, email me and I'll send you this PDF.)


Today I looked at a plug-in that does this unfolding for you, called Waybe.

Waybe can take a simple or complex SketchUp models, and unfold it into a printer-friendly format, maintaining all of the model's colors and materials. It's not exactly a one-click operation; for anything complex you need to divide your model into groups which get unfolded one at a time. (This is actually a good thing: it requires you to think and plan which sections of the models should be separated.) Waybe also includes fold tabs; very helpful.

On Waybe's home page you'll see this cool example of a tank model in SketchUp and its 3D paper model:


Teachers: there is an educational version of Waybe available for $80. But check out this page - it looks like they are having a promotion where you can get this version for FREE during the 2009-2010 school year. What a no-brainer!

If you've used a similar plug-in for creating paper models, let me know! I'm looking at Pepakura next...


Anyone can design anything in 3D! www.3dvinci.net
Email Newsletter icon, E-mail Newsletter icon, Email List icon, E-mail List icon
Join our FREE Email Mailing List!


Monday, November 9, 2009

Upcoming November SketchUp Projects

On November 15th, subscribers to our Projects of the Month will be getting a fantastic batch of projects! If you haven't signed up, what are you waiting for? You get 36 projects (3 per month for 12 months) for $36 - that's $1 per project. A no-brainer, IMO.

Here's what's on tap for November:

American Flag

This project has it all: a bit of math, valuable lessons in spatial thinking and planning, and use of color and components. You start with a schematic drawing of the American flag, and create its geometrically accurate SketchUp model.


Cutout from a Photo

If you've ever wanted to jump into a SketchUp model, here's the next best thing. All you need is a digital photo, and you can create a "cardboard cutout" component to stick in any model. Bonus: this cutout always faces you, so it doesn't look like it's 2D.


Cube Nets

I've worked with a lot of geometry teachers lately, and this is just the sort of thing they want to see. A cube can be "unfolded" into 11 nets. This project will show how to find all 11 distinct solutions, but you don't have to share the answers with your students till they've tried it themselves.


Feedback on our past projects was incredibly positive; I'm excited to see how these projects go over! Again, here's the link to sign up.

Anyone can design anything in 3D! www.3dvinci.net

Email Newsletter icon, E-mail Newsletter icon, Email List icon, E-mail List icon
Join our FREE Email Mailing List!


Tuesday, November 3, 2009

Challenge Yourself!

Design competitions are a great way to exercise and show off your modeling skills. Every so often Google hosts a competition with cash prizes, such as the recent shelter design contest, or last year's bridge modeling contest, which I helped judge.

But if you're in it for the bragging rights and not the money, check out the SketchUp 3D Challenge Site. Every 2-3 weeks someone posts an idea for a competition, and readers can vote for the winners.

The latest competition is for the design of a sports stadium. Hurry up - entries can be submitted until Nov 11!


Teachers: keep an eye on the 3D Challenge site and if a topic comes up that would interest your students, have them enter. Extra credit for contest winners!


Anyone can design anything in 3D! www.3dvinci.net

Email Newsletter icon, E-mail Newsletter icon, Email List icon, E-mail List icon
Join our FREE Email Mailing List!


Friday, October 30, 2009

Geofix: Awesome Geometry Toy

This is a little delayed, but I visited the Didax booth last week at NCTM, and found some cool toys. What I took home was a small set of Geofix tiles - a set of interlocking polygons of equal edge length, which can connect to form Platonic and Archimedean solids, as well as stuff like mushrooms and snails:


As soon as I got home and showed these to my kids, they sat on the floor playing with them (and fighting over them) for a long while. My 9-year old made the snail.


Anyone can design anything in 3D! www.3dvinci.net

Email Newsletter icon, E-mail Newsletter icon, Email List icon, E-mail List icon
Join our FREE Email Mailing List!


Thursday, October 22, 2009

Math Teachers Dig 3DVinci

I'm in beautiful Boston, MA today and tomorrow, for the regional meeting of NCTM. This morning, Jon Choate and I gave a talk on 3D geometry with Google SketchUp. We had one of the larger conference rooms (about 300 capacity), and it was standing room only. At some point they stopped letting people in.


At the booth afterward, people said our talk was the highlight of their day, and that many people spent time at other presentations in the back, downloading and playing with SketchUp.

For the models used in our talk, see our 3D Warehouse collection.

Anyone can design anything in 3D! www.3dvinci.net

Email Newsletter icon, E-mail Newsletter icon, Email List icon, E-mail List icon
Join our FREE Email Mailing List!


Tuesday, October 20, 2009

Escher for Halloween

I got this model from a teacher named June Still-Flores, who created these triangular Escher tiles after working through one of our September Projects of the Month.


Here's part of what June wrote:
I want to thank you for all the information you have about Sketch up. We are a small school (www.parkviewchristian.net) and we have started a high school this year. Its very non-traditional...we have 2 full time freshmen that come all day monday thru friday, and we have 12 more homeschool kids that come in various times for various classes. This year I have become a teacher for the "electives" for our freshmen. I am using SketchUp for our graphic arts class. I have never used SketchUp till I started this class. Your projects are a Godsend for our class. I started to search for more information about SketchUp lesson plans and I am soooo glad I came upon your site. It has been informative and useful. I have subscribed to the projects of the month club, which we are using for our class projects. I have been working on the Escher Triangle project. It has taken me about 3 hours and lots of "undoing" but feel a sense of accomplishment now that I have done it.

Anyone can design anything in 3D! www.3dvinci.net

Email Newsletter icon, E-mail Newsletter icon, Email List icon, E-mail List icon
Join our FREE Email Mailing List!


Tuesday, October 13, 2009

October Projects are Ready to "Ship"!

On October 15th, subscribers to our Projects of the Month will be getting their second batch of projects. (The September projects were described here.)

If you haven't signed up yet, here's some incentive to do it soon: the $24 per year price will go up to $36 next month!

Here's what's on tap for October:

Hexagon Mosaics

You'll learn how to tessellate a hexagon, and use simple tools to embellish the pattern. This project also makes use of components, for easy, all-at-once updates.


Changing Textures

You've probably painted faces using materials like brick, stone, and tile. This project will show ou how to change a material's size, color, and exact placement.


Placing and Sizing in Google Earth

See how to place a SketchUp model in Google Earth, how to adjust the model's size and location, and how to make copies of the model.


Feedback on the September projects was incredibly positive; I'm excited to see how these projects are received as well! Again, here's the link to sign up.


Anyone can design anything in 3D! www.3dvinci.net

Email Newsletter icon, E-mail Newsletter icon, Email List icon, E-mail List icon
Join our FREE Email Mailing List!


New Math Forum Project: Escher!

SketchUp + Escher = Skescher?

Here's my October project for the Math Forum: creating Escher tiles based on a square. This project appeals to math students, but also kids in art or graphic design classes. I let my own kids loose with this project, and they had a blast (though the model below was made by yours truly).


Escher was a genius - not only does his work teach concepts like tessellation, but also requires that you use your imagination to come up with animals or strange-looking people or monsters. What kid (or adult) wouldn't find that fun? And what better application to create these tiles than SketchUp?


Anyone can design anything in 3D! www.3dvinci.net

Email Newsletter icon, E-mail Newsletter icon, Email List icon, E-mail List icon
Join our FREE Email Mailing List!


Friday, October 9, 2009

Modifying a Push/Pull

In addition to writing about useful plugins (see here, here, and here), I also like to write about features within SketchUp itself that most people don't know about. The subject of this post is the ever-popular Push/Pull tool, which you can modify with the Ctrl key (PC) or Option key (Mac).

Say you start with 3 concentric, flat circles:


This is what you get when you use Push/Pull on the red circle:

But this is how the underside looks - the original circle has been "sucked" up to the top of the red cylinder. What if you want to keep that face there?

The pulled faces always disappear when they are within other faces. If you pulled up the yellow and green circles, only the outer (green) circle would remain on the bottom.

Here's how you can preserve the pulled face. Starting over with the flat circles, activate Push/Pull then press (don't hold) Ctrl/Option. You'll see a "plus" sign on your cursor. Pull up as normal; from this view the result looks the same as before.

But on the underside, you still have the face at the center of the circles. It's been switched from front to back (the color is the "back" color), and I have no idea why this happens, but at least the face is still there.

If you then use Ctrl/Option for the yellow and green faces (you have to press the key anew each time), you'll keep all three faces at the bottom.

Here's a more practical application: cutting a window. The flat orange face below is to be pulled forward, to create the window moulding.


With or without the Ctrl/Option key, the window will look fine from inside the room.

But here's how it looks from the outside, without the modification - the moudling face was sucked back into the room.

With the Ctrl/Option key, you keep the face (albeit reversed) within the wall.


Anyone can design anything in 3D! www.3dvinci.net

Email Newsletter icon, E-mail Newsletter icon, Email List icon, E-mail List icon
Join our FREE Email Mailing List!


Teen Center, Designed by Tweens

Mike Valler works with the Boys & Girls Club of Greater New Bedford, and has been showing his kids how to use SketchUp. Here is the design the kids came up with to fill the space in their new teen center. All of the furniture was designed from scratch, so just imagine what they'll put in those rooms once they start using the 3D Warehouse.

The designers of this project are between 10 and 12 years old. Pretty impressive.

Click the 3D button on the model below, and then drag the mouse from left to right to spin it around. Zoom in and out with your scroll wheel.


Mike says:
The only training they had was help by asking me as we went. It was very much a trial and error on all of our parts... but great fun. And for them to help create what is now the teen center was really cool for them.
If you want to download this model, get it here in the 3D Warehouse.


Anyone can design anything in 3D! www.3dvinci.net

Email Newsletter icon, E-mail Newsletter icon, Email List icon, E-mail List icon
Join our FREE Email Mailing List!


Monday, October 5, 2009

What a Great Way to Start off the Week

Willy Felton is a teacher who is using my ModelMetricks and GeomeTricks materials with his students. I blogged about him before - see One Teacher's Opinion.) He sent me a link to this YouTube video he made showing what his students have done:


There's nothing like seeing the fruits of your work - the projects I've designed, with each student's personal touches.


Anyone can design anything in 3D! www.3dvinci.net

Email Newsletter icon, E-mail Newsletter icon, Email List icon, E-mail List icon
Join our FREE Email Mailing List!