Wednesday, September 30, 2009

Raised Fret Model

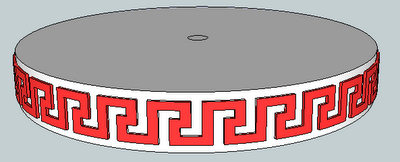
A reader named Walter Page sent me an example of what he recently created with Joint Push Pull, a free SketchUp plugin I described last week. Walter created a cylinder with 27 identical raised frets:


Here's a quick description of how he did it:

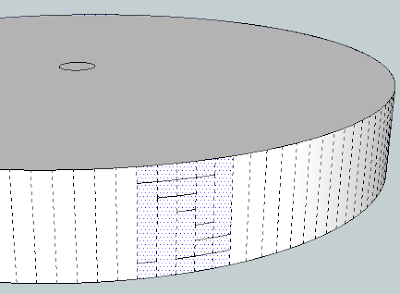
The pattern repeats over 5 faces (highlighted below), and there are 27 total frets. So he started with a circle that has 27 x 5 = 135 side. Once the cylinder was created, hidden edges were displayed, and he created the edges needed for one fret:


Here are the faces of the fret, shown in red:
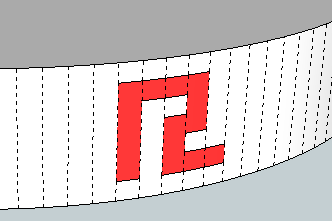


The red faces were rotate-copied around the cylinder 26 times.
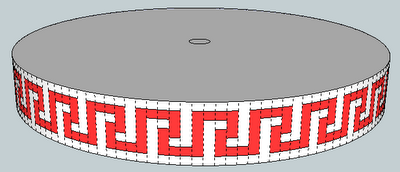


All of the red faces need to be selected before using Joint Push Pull, and you can use Select / All with Same Material to get them all at once. Only after all faces are selected should hidden edges be turned off.
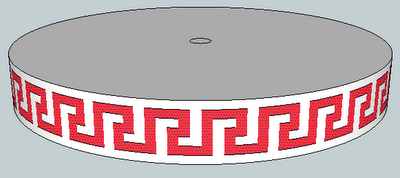


Then run Joint Push Pull, and presto. No way could you create these frets so easily without this plugin.


I asked Walter for some info about himself, and here's what he said:
I am 74 years old today, I have worked in the petrochemical industry most of my working life, from apprentice to draughtsman to designer to project engineer and finally to senior project engineer. I am still involved with the industry through an agency and have recently been modelling a process plant for one of my clients, size of the file is approx 150 MB, one of many.
From a very early age I have been interested in Technical Illustration, this was mainly through seeing the centrefold illustrations that appeared in the Eagle comic (Dan Dare). In the early days I used various plastic templates, but with the arrival of the computer age I have been able to achieve my life long wish to produce Eagle type models. I don't see this as a chore, I get great pleasure from it. At the end of the days work I can look at the model and know that I have achieved something.
I first used SketchUp 4 some years ago, at that time I was surprised at what it could do, other similar software was very complicated and too costly. I am self taught and put to rest the saying 'that you can't teach an old dog new tricks' Oh yes you can!

I feel the same way - it's quite satisfying and fun to create something beautiful, even if it's only on your computer. That's why I spend too many late nights doing this stuff...


Anyone can design anything in 3D! www.3dvinci.net
Email Newsletter icon, E-mail Newsletter icon, Email List icon, E-mail List icon
Join our FREE Email Mailing List!


Friday, September 25, 2009

Photo in Frame: One Teacher's First Attempt in SketchUp

I got an email from a tech-ed teacher named "Mrs. V," who told me:
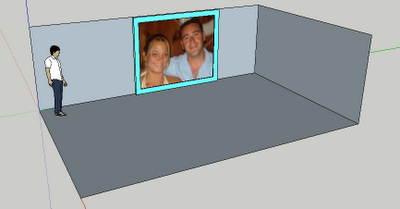
I tried your poster lesson for my VERY FIRST try at SketchUp. (Just myself, as a teacher/learner, not with a class.) I attached the drawing. It was fun and generally I had no problems with the directions for a first timer.
Here are her results:


Keep in mind that she had NEVER used SketchUp before, and was immediately able to create a room and group it, then import a photo and place a frame around it. Not bad for a first effort! Her blog about teaching technology is http://fivbert-technologyteacher.blogspot.com.

This wall poster project was included in our September set of SketchUp Projects of the Month. It can also be found online for free (PDF), for anyone who wants to see how these projects are set up. So far, we've heard only good feedback from our subscribers!


Anyone can design anything in 3D! www.3dvinci.net

Email Newsletter icon, E-mail Newsletter icon, Email List icon, E-mail List icon
Join our FREE Email Mailing List!


Monday, September 21, 2009

One Teacher's Opinion

Here's an email I recently got from a teacher:

After teaching Geometry for years I have been looking for a way for my students to play with the shapes that are so central to the subject matter. Daniel Pink in a "Whole New Mind" talks about how the skills of the 21st century will revolve around creativity and design and that these skills should be pervasive in education. Integrating SketchUp into my curriculum teaches mathematics along with these important 21st century skills. I have found that SketchUp is a great way for students to experiment with abstract and realistic geometric shapes in their own creative way. They feel a sense of ownership and control over the mathematics in stark contrast to the shapes and designs shown in textbooks.

My students have enjoyed learning the tools of SketchUp because of their love for computers, and I have found that they can manipulate complex shapes without the drudgery of normal construction tools. I had a student create an icosahedron on the second day of class, I had a discussion about symmetry and Platonic solids in a more natural way than would have occurred if I had presented the material as a lecture.

SketchUp is a much more engaging tool for today's students than tractional compass and straight edge. I am a self-taught SketchUp user and 3DVinci has been a great resource for me to learn how to demonstrate geometrical ideas to my students with technology. Once students have made objects in SketchUp I show them the Geometrical theorems that apply to their work, and not just abstract shapes to which they have no connection.

Geometry is all around us and SketchUp allows students to explore the relationships of shapes that exist in their world in a fun and engaging way. Teaching SketchUp in my classroom always results in comments like "wow", "this is so neat", and "look what I created". Students are asking me questions about Geometrical concepts because they want to create and explore the shapes, not because they need to study for a test.

I have found the material in 3DVinci books to be clear and easy for students to follow.

Willy Felton
5th year teacher of Algebra 1, 2, Geometry, Precalculus, Trig
The Community School
Sun Valley Idaho

This absolutely made my day.


Anyone can design anything in 3D! www.3dvinci.net
Email Newsletter icon, E-mail Newsletter icon, Email List icon, E-mail List icon
Join our FREE Email Mailing List!


Wednesday, September 16, 2009

Essential Plug-In: Joint Push Pull

I'm trying about once a month to try out and write about a popular SketchUp plug-in. Previous examples are Component Spray and Draw Metal.

This time the featured plug-in is called Joint Push Pull. Now that I've used it, I don't know how I lived without it (OK, slight exaggeration).

The original plug-in can be found here. (There appears to be a more recent version on www.sketchucation.com but I was having login problems and was unable to download attachments.) To install the plug-in, download the ZIP file and place all its contents into the "Plugins" folder of your SketchUp installation. There's also a link to download the documentation (PDF).

Here are the two icons for the plug-in. I didn't play with Vector Push Pull (the icon on the right), this post is about Joint Push Pull (the icon on the left).


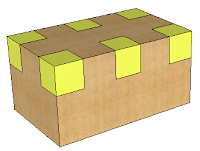
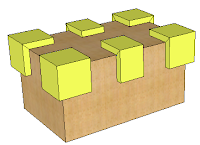
One thing this plug-in can do is push or pull multiple faces at once. As a simple example, I made a box with some side and corner pieces, shown in yellow below).

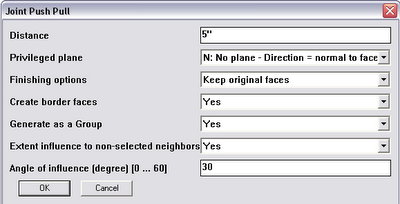
First you select the faces you want to pull (a face's right-click menu has a conveient option for this: Select / All with same material). Then click the Joint Push Pull tool (also found in the Tools menu). You need to specify the pull distance, and "N" for privileged plane means all pulling will be normal to the face (like a regular Push/Pull). There are also options for what do with original faces, whether to create border faces, etc.


Set your options, click OK, and all faces are pulled out at once. (Which would be rather a pain to do with the regular Push/Pull tool.)


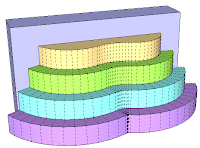
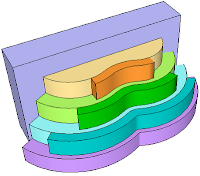
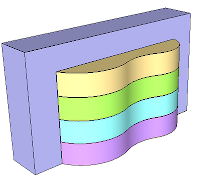
Here's another example, which shows how JPP can be used to pull or push curved surfaces, something impossible to do with SketchUp's provided tools. I started with this model comprised of wavy surfaces.


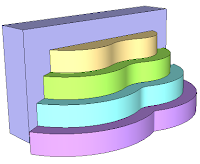
I used JPP on the green, cyan, and purple faces, each time with a larger extrusion distance.

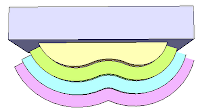
One thing to keep in mind: faces are projected outward or inward according to their slopes at either end. So in a case like this, the new faces don't line up with the dark blue rectangular face in the back (though this could be easily fixed with the Move tool).

Here's another feature of JPP: you can pull out only certain segments of a face. To do this, you need to have hidden edges displayed (View / Hidden Geometry).


In this example, I selected a few segments each of the yellow, green, and cyan faces, and pulled them out all at once. After some smoothing of edges, adding a few edges, and applying some new colors, I got this:

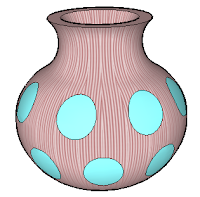
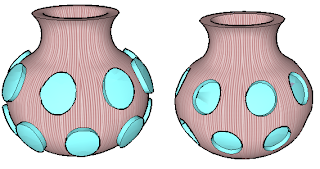
Here's another example: a vase with projected circles all around. (I created the circles by using the Intersect tool on some cylinders, which I later erased.)

The vase on the left shows all cyan faces pulled outward. The vase on the right shows the faces pushed inward, which means a negative extrusion distance, and the option "Erase original faces."


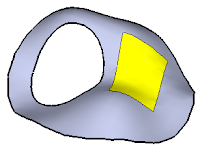
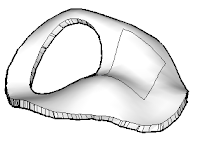
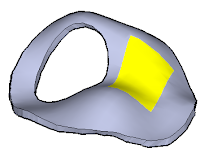
Finally, JPP can be used to thicken a surface. I created this model using the sandbox tools. I projected and cut out a circle, and projected a square and painted the projected face yellow. I softened all edges except for those surrounding the yellow face (which involved a little trick - making the yellow face a group and then exploding it).

I ran JPP with the option "Reverse Faces (for thickening)." Maybe this doesn't occur with the updated version of JPP, but whether I used a positive or negative extrusion distance, my "front" faces ended up on the inside.

Which is easily fixed by selecting all faces and choosing Reverse Faces from the right-click menu.

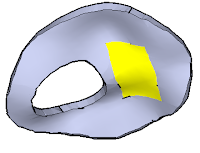
This is how the underside looks: the same circular cutout and the projection of the yellow face. The results aren't always perfectly clean, but small errors are easily fixed.

Give this plug-in a try; you'll find lots of uses for it.


Anyone can design anything in 3D! www.3dvinci.net
Email Newsletter icon, E-mail Newsletter icon, Email List icon, E-mail List icon
Join our FREE Email Mailing List!


Tuesday, September 15, 2009

SketchUp on the Math Forum

Thanks to Jon Choate, my co-author on the GeomeTricks books, SketchUp now has its own page on Drexel University's Math Forum. The Math Forum is one of the best-known resources for math teachers, and we're proud we can contribute to this community!

These FREE SketchUp materials can be found on http://mathforum.org/sketchup. You'll find videos, links for teachers, and a monthly math-challenge project.

This month's challenge involves the famous "Painted Cube" problem: if you create a large cube by assembling smaller cubes, and paint all outside faces, how many cubes have zero, one, two, and three faces painted?


It's a great project for 3D thinking, spatial relations, and identifying patterns in a table of numbers.

If you're not a math teacher, please find one and let them know about this!


Anyone can design anything in 3D! www.3dvinci.net
Email Newsletter icon, E-mail Newsletter icon, Email List icon, E-mail List icon
Join our FREE Email Mailing List!


Friday, September 11, 2009

September SketchUp Projects

Our first set of SketchUp Projects of the Month is ready to go out, and will be emailed to subscribers next Tuesday, September 15.

Here's what we have this month:

Escher Triangles: by starting with one equilateral triangle, you'll learn how to create and copy lines and shapes, to make some very cool repeating patterns. Great for geometry students!

Placing a Poster on the Wall: You'll learn how to take a digital image and "paste" it to a wall to make a poster. You'll even learn one way to make a poster frame.


Paper Cutouts: All you need is a simple SketchUp model, a printer, scissors, and tape. (Since my seven-year old saw me make the model pictured below, my house is now full of paper models of skyscrapers, stores, school houses, doghouses, birdhouses....)


You can still sign up and get the September projects, plus 11 more sets of projects as the year goes on. For the time being, the promotional price is still just $24 - not bad for 36 start-to-finish projects. (Which, by the way, are NOT just for kids.)


Anyone can design anything in 3D! www.3dvinci.net
Email Newsletter icon, E-mail Newsletter icon, Email List icon, E-mail List icon
Join our FREE Email Mailing List!


Friday, September 4, 2009

Upcoming Book - SketchUp and Interior Design

The contract is now officially signed: I will be working on a textbook on SketchUp for interior design, to be published by Pearson / Prentice Hall. The book will be geared toward students in higher education. From what I hear, currently about 30% of all interior design students use SketchUp. A great textbook will help push that number closer to 100%!

My co-author will be my friend and colleague Annie Elliott of bossycolor interior design. Annie did the kitchen design in my house a few years ago, and I introduced her to SketchUp. She adopted SketchUp as her favorite design tool and hasn't looked back. So she'll be the creative force in the book - I'll rely on her to tell me if the end table I choose for a living room is in horrible taste (if left on my own, the whole room would probably look awful - I'm an engineer for Pete's sake). Annie has a fun and interesting blog; check it out.

Don't line up at your bookstore just yet; the book probably won't hit shelves till late 2010 or early 2011. But it'll be well worth the wait!


Anyone can design anything in 3D! www.3dvinci.net
Email Newsletter icon, E-mail Newsletter icon, Email List icon, E-mail List icon
Join our FREE Email Mailing List!


Tuesday, September 1, 2009

Finally! 3D Geometry!

Math teachers often lament the fact that 3D objects such as Platonic and Archimedean solids are hard to teach, because it's hard for students (and even teachers themselves) to visualize these objects. Well those days are over! It's quite easy to make most of these objects in SketchUp, and when you can see it, you understand it.

After many months of hard (but fun) work, I've released two new books on 3D geometry, which show you exactly how to create all of these cool objects. Click the book covers below for more info.


Book 1 focuses on cubes, octahedrons, and tetrahedons, and the various objects that can be derived from them. Book 2 shows all the solids that can be made from a "golden rectangle" - icosahedrons, dodecahedrons, and lots of amazing derivative objects.

Want to know what's in each chapter? Here are chapters details for Book 1, and chapter details for Book 2.

(The book links above take you to the PDF page for each book, but they are also available in print.

My co-author, Jon Choate from Groton School, thinks that SketchUp can revolutionize the way geometry is taught. I hope these books help pave the way!


Anyone can design anything in 3D! www.3dvinci.net
Email Newsletter icon, E-mail Newsletter icon, Email List icon, E-mail List icon
Join our FREE Email Mailing List!