Monday, December 1, 2014

SketchUp to Layout, Updated for 2015

I still have on my "to-do" list an update for my LayOut book, as well as a speciality book on LayOut real-world case studies. But in the meantime, if you need to get your LayOut 2015 skills in gear, read on!

I've written a few times about Matt Donley (aka "MasterSketchUp") since he first published his SketchUp to LayOut e-book in 2013. Matt's webstore is SketchUp to LayOut, where he sells his book and training packages.  And his materials are all fully updated for SketchUp 2015!

 There are three packages on offer, which you can view at the very bottom of the SketchUp to LayOut page:
  • The Basic Package contains the 288 page e-book.
  • The Professional Package includes the book, plus an assortment of materials, hatch patterns, templates, styles, and LayOut scrapbooks. This package also includes discounts for other plugins and tutorials.
  • The Video Course includes all of the above, plus over three hours of instructional video you can stream or download.
Also worth checking out: Matt's MasterSketchUp site. This is mainly a blog with a wealth of modeling tips and tricks. The latest tips have to do with integrating plugins (extensions) from 2014 to 2015. Lots of good stuff in there!


Anyone can design anything in 3D! http://www.3dvinci.net/

Email Newsletter icon, E-mail Newsletter icon, Email List icon, E-mail List icon
Join our FREE Email Mailing List!


Thursday, November 6, 2014

Ebook on 3D Printing Projects

The 3D printer company Afinia has released a nice ebook that features a variety of educators and STEM leaders, discussing how they use 3D printing with students. There are even a couple pages on me and my 3D printing book.


You can access the book here:

http://www.afinia.com/3d-printers-and-printing/announcing-the-afinia-3d-printer-enhanced-educators-ebook

Follow the link - you'll have to enter your name and email address - the book is full of ideas you might want to try.


Anyone can design anything in 3D! http://www.3dvinci.net/

Email Newsletter icon, E-mail Newsletter icon, Email List icon, E-mail List icon
Join our FREE Email Mailing List!


Tuesday, October 21, 2014

SketchUp Molecules!

This plugin appears to be from last year, but I hadn't seen it before and it's AWESOME. If you're a chemistry or physics teacher (or student), give this a try.

Open SketchUp and click the Extension Warehouse icon.

 Search for "Molecule" and install the Molecule Importer plugin.

(According to the description, this plugin isn't listed as updated for SketchUp 2014, and you'll see a message about that when you install it. It seems to work fine,though.)

It appears that this plugin will create models from files of several types of formats, but the format mentioned in the plugin's description is MOL. A quick Google search led me to this NIST site, where you can enter a molecule name and get its geometric layout as a MOL file.

I entered H2SO4 (sulfuric acid), one of the few molecules I actually remember from high school and college.

After clicking "Submit," I got a list of MOL files. I studied civil engineering, with pretty minimal chemistry training, so I have no idea what the various options are. I just clicked on the first one on the list.

The text in the window that appears is the contents of the MOL file. So I copied and pasted all of the text into Notepad, and saved it as a file named H2SO4.mol.

In SketchUp, the plugin has added more format options that you should see when using File / Import. But when I tried imported the MOL file this way, it didn't work. (Maybe that's what worked in previous versions but not 2014.) But you can also access the plugin through the main menu: choose Plugins / Molecule Importer / Import MDL Molfile.

Here's my molecule: 2 hydrogens, one sulfur, four oxygens. All are the correct size, at least relative to one another, and the bonds are represented as well. I assume the layout is correct - NIST should know these things, right? If you measure the actual size, the entire molecule is about 30' long. I'm thinking this would be amazing to create on a 3D printer, which means a pretty major resizing.


Another issue that will arise when 3D printing: if you look at the model in X-Ray view, you'll see that the bonds are too long - they hit each other inside the spheres. So they'd have to be edited and shortened.
Also, how to print the spheres? Stay tuned for a (hopefully) upcoming post...


Anyone can design anything in 3D! http://www.3dvinci.net/

Email Newsletter icon, E-mail Newsletter icon, Email List icon, E-mail List icon
Join our FREE Email Mailing List!


Monday, October 20, 2014

Twilight Render Now Has a Free Version

Rendering applications continue to offer more and more options, while taking less time to operate and while also coming down in price. (I remember when you had to run a render overnight and check it out over coffee the next day. Now you can get great images in seconds or minutes.)

I ran across this on the Facebook page for SketchUp Artists: The Twilight rendering application now has a free version available. (Not that the Pro version is so pricey - it's just $99.)

The free version is called "Hobby" and can be downloaded here. (For some reason I had trouble accessing this web page from Twilight's home page, but the link from SketchUp Artists worked.)


Rendering is most definitely not one of my specialties - I confess that the hundreds of options for backgrounds, lighting, and materials are overwhelming. (I also admit I haven't invested the time in learning the ins and outs of rendering; I'm sure it's not too crazy once you work through some tutorials.) So I appreciate when a program offers a one-click render option, like this one does.

Here is the very simple example I tried:

In searching for an interior design model, I found a cute model of the bedroom from the movie "Toy Story."

The Twilight toolbar looks like this, and it should appear automatically after installing Twilight. The first icon performs the rendering, and the other icons handle lighting, environment (background, sun, haziness), materials, and field of view.


Here's my first render, using the default settings. Looks good, except the brick wall isn't brick in the model.


From my experience with 3D printing, I know that the fronts and backs of faces matter, and in this case it looks like the wall with the window was showing its back face. A common mistake, and easy to miss when your faces are painted! It's also easy to fix in SketchUp - you can just reverse faces. Here's the lovely new render.


The faces are all rendered with the materials as defined in SketchUp. Like any respectable renderer, Twilight has many other material options you can choose from. The 4th icon in the Twilight toolbar opens the material settings, and you can use the eyedropper to pick up any material in the SketchUp model. Here's the floor's wood material.

I changed the floor material to a solid color (red!), and its bump to the "Procedural" method. The texture I chose is called Perlin. I don't know what this all means, but it looks cool.

And here's the new floor, which actually looks a bit like shag carpet. This looks like a place Andy would feel at home in.

Download Twilight and try it on an exterior view of a house, a close-up of an appliance or a toy, or a landscape model. The renderings work pretty quickly, depending on the quality you choose, and you'll easily create some beautiful images.


Anyone can design anything in 3D! http://www.3dvinci.net/

Email Newsletter icon, E-mail Newsletter icon, Email List icon, E-mail List icon
Join our FREE Email Mailing List!


Color by Layer

This is a often-missed feature of SketchUp that I'd always wanted to blog about, but my friend Matt Donley beat me to it, with his Color by Layer post. In addition to showing how to use this feature, Matt mentions what types of models could benefit from it, such as when you want to differentiate existing from new construction:


In Matt's post he also includes a list of valuable tips for this feature, like how you can use translucent colors, and make a temporary color change to identify objects that may be on incorrect layers.

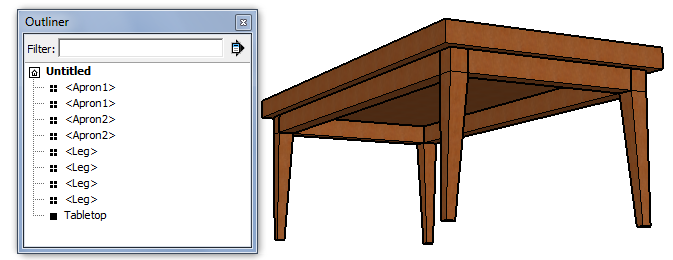
I thought here I would show a very simple example of what Color by Layer looks like. I modeled a very basic table, whose top is a group, legs are identical components, and the two aprons are also components.


In the Layers window I added three layers - one each for aprons, legs, and tabletop. Each layer has its own color, which could be changed by clicking the color square.


Objects are assigned to layers in the Entity Info window. But in this view, it's impossible to tell which objects are assigned where - all objects are painted with the same wood material.


To view each object in its layer's color, use the Styles window: Click the Edit tab, open the Modeling settings, and click Color by Layer. (You can also do this in the Layers window, by toggling on and off the Color by Layer option in the menu that appears when you click the Details arrow.)

That's it!

Be sure to click over to Matt's post for more details about Color by Layer.


Anyone can design anything in 3D! http://www.3dvinci.net/

Email Newsletter icon, E-mail Newsletter icon, Email List icon, E-mail List icon
Join our FREE Email Mailing List!


Tuesday, September 2, 2014

Great Tips for 3D Printing

My friend Matt Donley at MasterSketchUp has put together a great blog post detailing some of the things he's discovered during the time he's been 3D printing.

For example, I wasn't organized enough to save all of my failed prints (there were quite a few and I just tossed them). But Matt did, and he proudly displays them in his post:


Many of his tips are ones I discovered myself while writing my SketchUp for 3D Printing book, such as leaving enough tolerance for interacting parts, printing test runs to make sure interacting parts will fit, rounding corners for extra stability and strength. Other tips are more technical, like checking G-code manually. (I generally left the G-code writing to the printer itself.)

One of his tips that I hadn't thought of before has to do with grain direction - the angle the printer uses when laying down each layer. Generally printers will place one layer using a diagonal grain, the next layer using a diagonal grain in the opposite direction, repeat. These joints between layers can become a point of weakness and lead to warping. For optimal strength, Matt says:

A way to overcome this potential problem is to simply orient your model so that the X/Y axis plane is where you need the most strength. Layers print in the Z axis direction. Continuous extruion happens along the X/Y axis plane, so they are stronger.

Useful stuff! If you have a 3D printer, be sure to check out Matt's advice.

Anyone can design anything in 3D! http://www.3dvinci.net/

Email Newsletter icon, E-mail Newsletter icon, Email List icon, E-mail List icon
Join our FREE Email Mailing List!


Wednesday, August 27, 2014

Here's the 3D Printing Webinar

It's a bit overdue, but here's the recording of the webinar I did a couple of weeks ago with Inside3DP. The connection quality wasn't perfect, and there are some disconnects between audio and video in spots, but overall it seems pretty clear (I think!)

What I showed was how to use SketchUp to create a basic nameplate with rounded corners and engraved text. Also covered: making sure the model is watertight, installing and using the STL plugin, and some Q&A at the end.

Similar projects are detailed in my book Modeling with SketchUp for 3D Printing.

(NOTE: due to a glitch there's a delay at the start - things don't get going until about 4 minutes in.)


Here's the video's YouTube link.

Enjoy!

Anyone can design anything in 3D! http://www.3dvinci.net/

Email Newsletter icon, E-mail Newsletter icon, Email List icon, E-mail List icon
Join our FREE Email Mailing List!


Monday, August 11, 2014

I'm Doing a 3D Printing Webinar

If you'd like to see a basic SketchUp project (a name plate) targeted toward 3D printing, and have some time this Wednesday evening at 7 PM EST, sign up for my webinar with Inside 3DP. I'm very honored to be taking part in their very first webinar.

The project I'm planning to show will demonstrate a few basic SketchUp tools: Rectangle, Arc, Push/Pull, 3D Text, and Scale. I'll also show how to use the STL plugin to export your model into a 3D print-friendly format.

If you can't tune it, the recording will be archived, and I'll provide the link to that when it's ready.

See you then!

Anyone can design anything in 3D! http://www.3dvinci.net/

Email Newsletter icon, E-mail Newsletter icon, Email List icon, E-mail List icon
Join our FREE Email Mailing List!


Monday, July 21, 2014

SketchUp and String Art

A few weeks ago I was contacted by artist Henning Tauscher from Germany:
Hello there! I am Henning from Germany and I do a little string art in my spare time. I've been doing this for quite a while now and my projects became bigger and bigger. Now when you do a string art project that's 5 meters in diameter, filling a whole room, it becomes complicated imagining it, sketching it, or playing around with colours and patterns. (This is for the ceiling of a Psy Trance party, that I host with my crew.) I was looking for a way to visualize it on my PC to be able to play around and easily erase/change patterns. So when I was looking at SketchUp, which I was unfamiliar with at the time, I stumbled upon your "Project of the Month" from March 2011. It helped me a great deal with getting started in SketchUp, especially with the tools I need to produce string art. Now I would like to share my project with you, if you like. It came out really nice! Again a big THANK YOU and a hug from across the big pond!

Here's a shot of his finished project:


I don't hit a lot of trance parties these days, but I'd go to this one if it were a little closer to home :)

I asked to see Henning's SketchUp model and it's great! Here's the initial view, with a hip, black background and SketchUp 2014's defauilt person (Sophie) on the ground. She's good for providing a sense of scale.


Here's the front view, where you can see that the middle part slopes toward a lower center point, and the rest is flat.


I separated the three levels of objects to give a better sense of how the model is set up:


Henning made perfect use of components. In each of the three layers, there are components that are mirrored and rotate-copied about the center, to fill in the rest. Here's one of these components, where you can see the lines that stretch between the dividing points along each straight edge.


If you're wondering about the edge and background colors, these are set in the Styles window (menu: Window / Styles). On the Edge page of the Edit tab, you can set the edge color to "By Material." And on the "Background" page you can set background color, which then turns otherwise black edges to white (check out Sophie).

Here's one more shot of the finished product, which includes one of the surrounding mirror. Don't you want to go and hear some wild music now?


Thanks Henning - our "cool" factor has just gone up :)

Anyone can design anything in 3D! http://www.3dvinci.net/

Email Newsletter icon, E-mail Newsletter icon, Email List icon, E-mail List icon
Join our FREE Email Mailing List!


Monday, July 14, 2014

Great Rendering Tutorial

I've been corresponding for a few years with Jorge Lopez, an architect who also teaches at Kirkwood Community College in Cedar Rapids, Iowa. Last week, Jorge sent me a link to an easy-to-follow rending tutorial that he created for his CAD SketchUp class. The rendering application he used is IRender nXt, which has a 30-day, fully functional trial version.

Even if you're not planning to purchase an application like this, it's a great opportunity to learn step-by-step the basic mechanics of how to render a SketchUp model. Once you get the techniques, they can usually be applied to other applications. Give it a try!

The SketchUp model Jorge starts with is an interior pool (nice!) with SketchUp's usual cartoony look.


He starts with a one-click render, without adjusting settings or adding lights, which only takes a couple of minutes and looks pretty good:


The tutorial proceeds to show how to add lights (a table lamp, a floor light, a spotlight above the fireplace, some wall sconces) and how to apply light properties to SketchUp objects (the dome light of a ceiling fan, fire in the fireplace). Pretty stunning so far:


Then you learn about the finishing touches: playing with the reflective properties of the water, making the pool tiles a bit bumpy, making plastic and metal and glass look realistic, making mirrors reflect.


Here's the final rendering, before and after the final adjustments:


The tutorial ends with info on how to adjust the camera view,change the field of view, and create an animation.

If you've ever wanted to try your hand at rendering, Jorge's tutorial is a great way to start!


Anyone can design anything in 3D! http://www.3dvinci.net/

Email Newsletter icon, E-mail Newsletter icon, Email List icon, E-mail List icon
Join our FREE Email Mailing List!