Thursday, January 28, 2010

Fun Workshop Last Sunday

This past Sunday, I led a full-day workshop on SketchUp for the Capital Region Society for Technology in Education (or CRSTE), a relatively new technology group serving teachers in the metro DC area. There were 30 teachers in attendance, who were willing to give up a Sunday to learn something new. (Every time I meet with a group of teachers, I marvel at their dedication and passion, but then again I guess they would have chosen different professions if they were selfish and lazy.)

Here's a view of the crowd:


And here's me trying not to notice the camera in front of me:


By all accounts (at least the ones I heard), the workshop went really well. It's so much fun to introduce SketchUp to people who haven't seen it before: the "oohs" and "aahs" always come out at the first glimpse of Push/Pull, making materials translucent, making multiple copies, playing an animation, and sticking a SketchUp model into Google Earth. I thank CRSTE for giving me the opportunity to strut my stuff.

Next month I'll be participating in a CRSTE cyber-conference. Right now this link doesn't list me yet - the full catalog will be posted this Friday (tomorrow). If you're in the mid-Atlantic area, check out this conference - there are lots of interesting sessions.


Anyone can design anything in 3D! www.3dvinci.net

Email Newsletter icon, E-mail Newsletter icon, Email List icon, E-mail List icon
Join our FREE Email Mailing List!


Tuesday, January 26, 2010

Math Forum Project: Conic Sections

My January Project is up.

This is a straight-up geeky math project (geek being a complimetary term these days). You start by building a cone, then use SketchUp's Section Plane tool to create four different conic curves: circle, ellipse, hyperbola, parabola.

This project has a Teacher Version and a Student Version. If the students doing this project also know about curve equations, the Teacher Version has some info about verifying equations by getting various point coordinates.

I'm guessing this is definitely NOT something the SketchUp creators had in mind when they created SketchUp, but it's awesome for math-types!

If this sounds familiar, maybe it's because you've seen my video on this topic (which I see has gotten over 2,000 views!)


Anyone can design anything in 3D! www.3dvinci.net

Email Newsletter icon, E-mail Newsletter icon, Email List icon, E-mail List icon
Join our FREE Email Mailing List!


Thursday, January 21, 2010

Excellent Plug-In: Windowizer

I heard about Windowizer years ago, but never took a close look at it until today, while searching for a cool plug-in to write about. It's been very popular since it was created by Smustard's Rick Wilson for SketchUp 4 (now that goes back a ways).

Windowizer 3 is free, and you can get it here. (There's a version 4 out, which costs a mere $10, which I haven't tried yet.) Once you download the ZIP file, unzip and place all of its contents (several RB files and a TXT) into the "Plugins" folder of your SketchUp installation. You can read the TXT file for info and instructions.

Here's what I did with Windowizer 3:

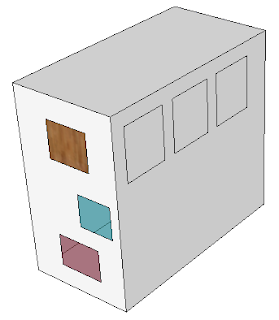
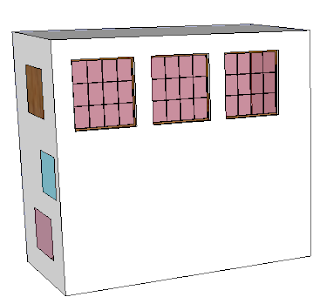
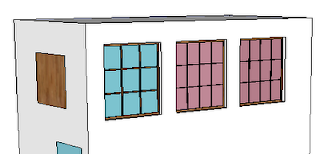
I've got a building with three "blank" windows. The colored squares along the side are only texture placeholders - Windowizer can paint window frames and glass either with a couple of default colors, or with colors that are already found in your model.

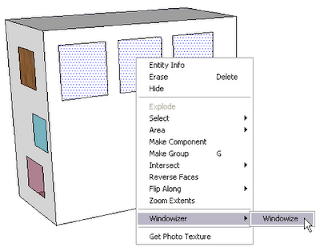
Since I want all three windows to look the same, I select all three, right-click on one of them, and choose Windowizer / Windowize. (Any face that will be windowized must have 4 edges and define a plane.)

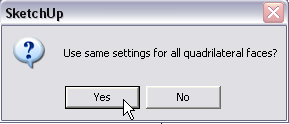
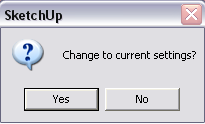
All windows will be the same, so I click Yes. (If I clicked No, I would get Settings window for each window separately.)


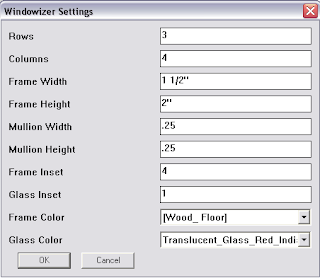
The Windowizer Settings window is where I can set the various window properties: rows / columns, mullions and frames, insets, and materials.


After clicking OK, all three windows have the new properties.


Windowizer 4 has the option to make groups out of your windows, but not Version 3. So if you wanted to use components, you would make a single window, make it into a component manually, and copy the component. If you're making dozens of windows, components are the way to go.

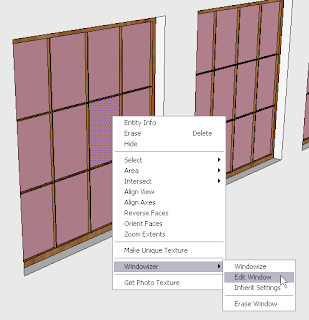
To change one of the windows, I right-click on one of the glass faces and choose Windowizer / Edit Window.


"Change to Current Settings" means you want to change the window to the properties currently in use. Those properties are the ones this window already has, so I click No.


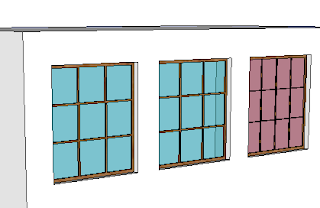
The Settings window appears again, and I changed the window to have a different glass color and fewer columns.


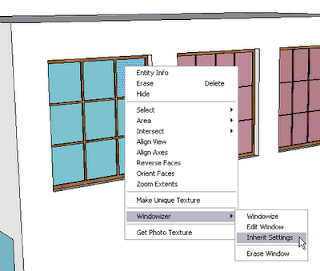
Now I want to copy these new settings to another window. So I right-click on a blue glass face and choose Windowizer / Inherit Settings. Now the settings of the blue window become the current settings.


Now I right-click on a red window and choose Windowizer / Edit Window. And this time, I click Yes when asked to change to current settings. This changes the red window to match the blue one.


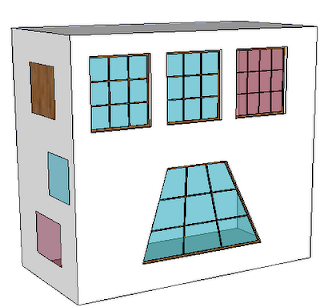
Windows don't have to be rectangular - any four-sided polygon will work.


You're also not limited to just windows. From the Windowizer website, these pictures show a stair rail and bookcase created with Windowizer:


Give it a try!


Anyone can design anything in 3D! www.3dvinci.net

Email Newsletter icon, E-mail Newsletter icon, Email List icon, E-mail List icon
Join our FREE Email Mailing List!


LayOut Video: SketchUp Scenes and Model Views

I made a short video yesterday that shows one of the techniques discussed in my new LayOut book. If you set up scenes in your SketchUp model (taking advantage of layers to control what's hidden and displayed), you can easily adjust what appears in the LayOut view.


The more I use LayOut, the more I like it.


Anyone can design anything in 3D! www.3dvinci.net

Email Newsletter icon, E-mail Newsletter icon, Email List icon, E-mail List icon
Join our FREE Email Mailing List!


Monday, January 18, 2010

New Book on LayOut!

I've gotten a lot of requests for a book on LayOut, and now it's ready!


LayOut is part of Google SketchUp Pro, and is a presentation tool. You can import a SketchUp model into a blank page or a set template, and interact with it (zoom, pan, orbit, etc). You can set standard views and scales, add text, labels, and dimensions, use objects from scrapbooks, etc.

Here's some general info about Layout.

So far, my new book is available as PDF, but with enough demand I can make it available in print as well.

Click here for info on the book, and click here to see exactly what's in the book (a Google Docs PDF).


Anyone can design anything in 3D! www.3dvinci.net

Email Newsletter icon, E-mail Newsletter icon, Email List icon, E-mail List icon
Join our FREE Email Mailing List!


Monday, January 11, 2010

Newspaper Geodesic Dome

As I wrote about in my previous post, one of our Projects of the Month (being sent out this coming Friday) uses Google SketchUp to model a geodesic dome. One teacher contacted me about a similar project, in which you can create a dome from rolled-up sheets of newspaper:

http://www.pbs.org/wgbh/buildingbig/educator/act_geodesic_ho.html

One difference between this project and mine (aside from the fact that one is physical and one is virtual) is that the newspaper dome uses only two lengths of tubes (71 cm and 66 cm). The SketchUp version has edges of a several different lengths.

It would be an interesting project to take the SketchUp dome and calculate how many tubes you would need of which lengths, then build it. Let me know if you try this - I'd love to see pictures!


Anyone can design anything in 3D! www.3dvinci.net

Email Newsletter icon, E-mail Newsletter icon, Email List icon, E-mail List icon
Join our FREE Email Mailing List!


Friday, January 8, 2010

What's Coming in Our January Projects

Yikes, I realize I haven't posted in a while! Winter break was rather busy (even as a stay-cation), and the return to "normal" always takes a while. And part of getting back on track means letting you know what will be in the January Projects this month. (Want to sign up?)

Geodesic Domes

Invaluable for geometry students!

Did you know that all you need to create a geodesic dome is a Platonic solid made of triangles? In this project, you'll start with an octahedron and use guide lines and components to make some very cool domes.


Jigsaw Puzzle

If you have a digital image, you can make a jigsaw puzzle. This project will show you how to create and scramble the pieces . . .


. . . and how to assemble them again.


Writing in 3D

It's fun to personalize your models, and the 3D Text tool lets you do just that. This project will show you how to use this tool for flat text, as well as embossed and engraved text.


Again, to sign up, go to to SketchUp Projects of the Month!


Anyone can design anything in 3D! www.3dvinci.net

Email Newsletter icon, E-mail Newsletter icon, Email List icon, E-mail List icon
Join our FREE Email Mailing List!