Tuesday, June 29, 2010

3DVia in the Classroom

I've been in touch with Cliff Medling from 3DVia, who has some pretty cool, free tools to visualize 3D models as a walking (and running) avatar. This video is intriguing:


I'm out of town at a conference, so I've only had bits and pieces of time to play with 3DVia scenes. In my limited time so far it's been a very cool experience, but I'm having a tough time maneuvering around as smoothly as I'd like. For instance, once I get in a corner of a room, I have a hard time getting out!

Once I get a presentable scene going I'll post about it. And I'll probably write up some instructions as one of my monthly plug-ins. In the meantime, give it a try yourselves...


Anyone can design anything in 3D! http://www.3dvinci.net/

Email Newsletter icon, E-mail Newsletter icon, Email List icon, E-mail List icon
Join our FREE Email Mailing List!


Sunday, June 27, 2010

Inkscape for Kids

I'm going to collaborate with my friend Phil Shapiro on some educational materials for Inkscape. If you're not familiar with this cool program, it's a FREE 2D vector drawing tool. Like SketchUp, it can be easily used by kids, and kids LOVE it. I got my kids started on it today, with very little guidance, and I've been hearing "cool!" "awesome!" and "Mom, check this OUT!" from the next room. This from my 9, 8, and 6 year olds - the 3 year old twins haven't started yet.

Phil recommended a book he saw on Lulu called Ilustratus (great name!) which costs a whopping $4.76 as a PDF download. I shelled out the money and now my kids are working through the projects. It seems pretty good for ages 5-8.


Our idea is to build upon these basic concepts and come up with a book / DVD / screencast, or some combo, to show kids a bunch of fun and easy art projects in Inkscape. We'll keep you posted! In the meantime, anyone who has experience with Inkspace and kids is welcome to get in touch to share ideas, suggestions, etc.


Anyone can design anything in 3D! http://www.3dvinci.net/

Email Newsletter icon, E-mail Newsletter icon, Email List icon, E-mail List icon
Join our FREE Email Mailing List!


Friday, June 25, 2010

Plug-In: PathCopy

I really like this plug-in, which is available for free from Smustard. You can use it to copy a group or component along any path.

As with most plug-ins, once you download the files (in this case, a couple of RB files plus a folder with the cursor icon), place everything (unzip if needed, keep the folder structure) in the Plugins folder of your SketchUp installation folder.

Here's a couple of ways I used PathCopy:

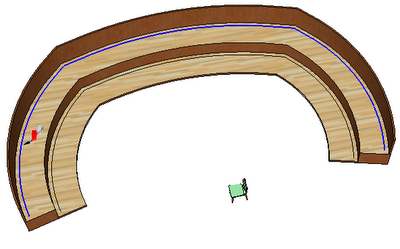
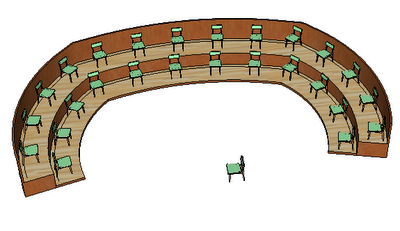
First up is a curvy room with space for two levels of chairs that face inward. I got the folding chair from the 3D Warehouse, and it's a component in my model.


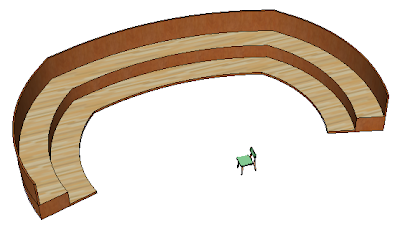
This plug-in needs a path, so I used the Offset tool to create two sets of curves parallel to the back walls. The back legs of the chair will be placed on these curves, so the curves are pretty close to the walls.

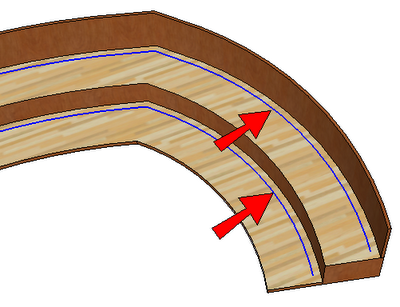
PathCopy can only take a single path. So I used the Weld plug-in to join each path's segments into a single path. So for this model, PathCopy will need to be used twice: once for each of the two paths.

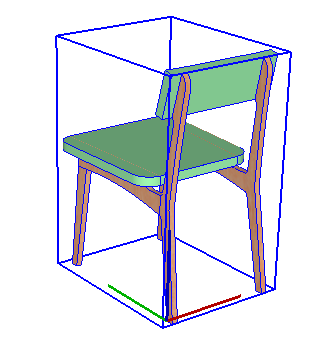
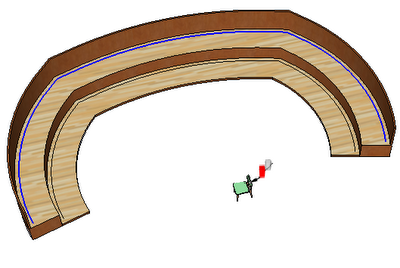
Here's a very important step, and it took me a few tries before I figured this out. For the object that will be copied, its red axis will go along the path. I'm not sure how this works for a group, but for a component it's easy: just right-click on the component and choose Change Axes. My red axis goes between the two back legs, and the green axis is set so that the blue axis will be vertical (otherwise the chairs will go upside-down).

To start the plug-in, choose Plugins / Copy Along Path / Copy to Spacing. The default spacing appears in the "Distance between" field. You can enter a new spacing, or you can change it after the copies are made.


Click the path (I'm starting with the one on the upper level).


Then click the object to copy (the chair component).

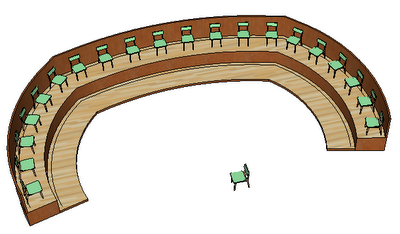
Done! The back legs go along the path, with a chair spacing of 3'-6".


I want fewer chairs, so I entered 5' and got my new spacing.

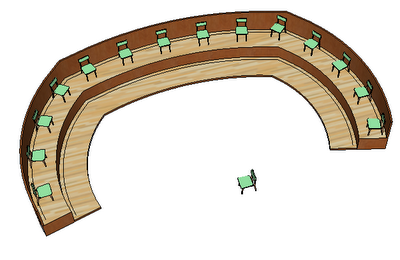
Using the plug-in again for the lower level, the 5' spacing is now the default.

Once done, you could erase or hide the paths and the extra component.

The other PathCopy option is Copy to Path Nodes. I didn't have much luck with this one - the orientation of each component didn't change with respect to the path. (Every chair ended up facing the same way.) If anyone has used this option and can tell me what I'm missing, please let me know!

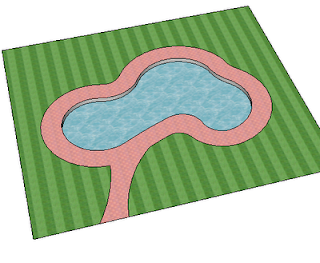
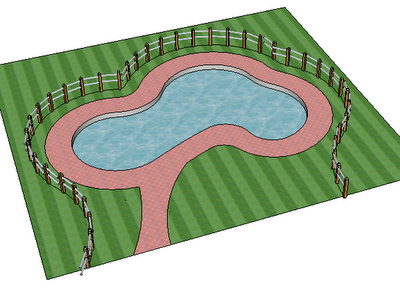
Here's the other model I tried, an oddly-shaped pool that needs a fence around it.


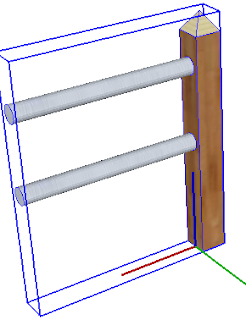
Here's the fence component, which I made 4' wide end-to-end. When creating a component, one of the options is Set Axes, and my red axis starts at the midpoint of the fence post, and proceeds in the same direction as the fence itself.

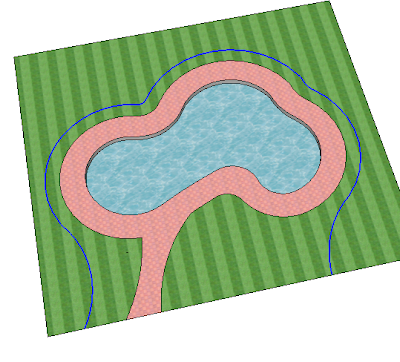
I created the fence path using the Offset tool, adding some arcs to include more of the yard, and using Weld to fuse the curves into a single path.


Using the Copy to Spacing option, with a spacing of 4', here's my fence. This would be an enormous pain to create without the PathCopy plug-in.

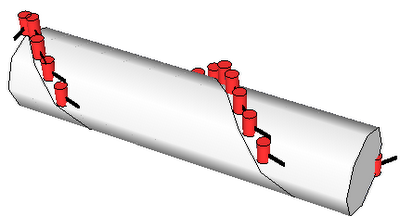
I tried using a 3D path - no luck. It seems that objects can orient themselves in the red-green plane, but the blue orientation does not change.

Again, here's where you can get this neat plug-in.


Anyone can design anything in 3D! http://www.3dvinci.net/

Email Newsletter icon, E-mail Newsletter icon, Email List icon, E-mail List icon
Join our FREE Email Mailing List!


Thursday, June 24, 2010

Book Review: Google SketchUp for Site Design

It wasn't that long ago that I had the only book on SketchUp on the market (ah, the good old days). In the last few years other books have appeared, some of which are pretty darn useful. And while my books discuss using SketchUp in general, some of these new books focus on a specific SketchUp user. One example is Robin deJongh's book on Visualization, and in the near future I'll also be reviewing Bob Lang's new book for woodworkers.

But the topic of this post is Google SketchUp for Site Design, by Daniel Tal.

I've met Daniel a couple of times: I saw his presentation at the last 3D Base Camp, and attended a workshop he ran for landscape architecture students at the University of Maryland. He demonstrated ways to create incredibly detailed landscape models that you might not think could be done in SketchUp. In his book, he lets us in on the methods and techniques he uses - many of these are much easier than they look.

After some intro material on basic tools, groups, and components, the order of the book follows the typical work flow of a landscape architect. You start with a 2D site plan, making use of the 2D drawing tools (Line, Circle, Arc, Offset, etc.) There's also a bit about modeling from an image of site plan (i.e. tracing). Then you get all of your site elements into 3D, making use of layers and styles for easy control of the display.

The concepts in this book go beyond landscape architecture. There are tutorials on making a detailed park bench, planters, decorative fences. And for the architects, there are tutorials on windows, doors, moldings, curved walls, and more.

As you might expect, there is a large focus on the Sandbox tools, and this is where I had my best "aha!" moments. For example, you learn how to make sloped terrain using a set of 2D curves.

Applying the From Contours tool gets you pretty nice results:

I really liked the canopy exercise:

And for me, the coolest architectural tutorial involved using the Drape tool to superimpose a set of straight lines onto a curved wall, to easily model a complex-looking set of windows:

The last part of the book is about the interaction between SketchUp and AutoCAD: a topic that comes up all the time among design professionals.

One of the best aspects of the book is Daniel's use of Ruby scripts. With the thousands of scripts out there, it's impossible to find a single resource that explains them all. (I'm chipping away at the mountain by using this blog to talk about some of the plug-ins I like.) Daniel uses a select few extremely useful scripts, some of which are free, some cost a nominal fee. These include Randor, PathCopy, Drop, Simplify Contours, Joint Push Pull, Surface Operations - all of which are worth learning even if you're not a landscape architect.

Like with all of my books, all of the models used in the book are on the 3D Warehouse, so there's no need for an accompanying CD. And this book is printed in COLOR, which is essential - this book would be almost impossible to read in black and white.

Highly recommended!


Anyone can design anything in 3D! http://www.3dvinci.net/

Email Newsletter icon, E-mail Newsletter icon, Email List icon, E-mail List icon
Join our FREE Email Mailing List!


Monday, June 21, 2010

Shadow Animation

One of my projects for the July batch of Projects of the Month will show how to use scenes and shadows to get an animation like this:


It's a neat technique to see how a house or room will look on certain days at certain times of the year. Plus it's neat to watch!


Anyone can design anything in 3D! http://www.3dvinci.net/

Email Newsletter icon, E-mail Newsletter icon, Email List icon, E-mail List icon
Join our FREE Email Mailing List!


Friday, June 18, 2010

SketchUp and the Kellett School in Hong Kong

This fun video contains models produced by Year 3 and 4 students at the Kellett School.


The following description was sent to me by Clive Dawes, Kellett's ICT Curriculum Leader:

Students at Kellett School in Hong Kong have been using Google Sketchup to help them investigate tessellation of shapes. Many of the ideas for the project, which was tackled by Year 3&4 students, came from the resource "Single Polygon Patterns," published by 3D Vinci.

Having spent some time trying out the activities for myself, I then created screencasts using Jing of myself demonstrating the techniques. Students were then introduced to Sketchup and spent time drawing some of the basic shapes they already knew using the polygon tool.

After seeing me tessellate squares, students then investigated which other basic shapes could tessellate. Techniques such as ‘select all’ and ‘copy & move’ were easy for the students to master, but accurate use of ‘endpoint’ was challenging for some and this resulted in some untidy attempts at tessellation. Students soon realized that not many basic shapes could be tessellated without leaving gaps but some predicted that the triangle would work if only it could be “turned upside down.” We then introduced the rotation tool and a screencast was used to reinforce the techniques as some found it tricky to master.

From there students worked at their own pace creating a variety of tessellated patterns, some extremely complex. A number of students were able to develop designs with gaps as shown in the resource.

All our Year 4 students worked on tessellating irregular quadrilaterals and the vast majority of them were able to use the component tool to add intricate designs and patterns. They used the line tool and the arc tool as well adding shapes within their tessellations. They were very creative and produced some amazing work.

We also looked at 3D shapes and investigated some of the ideas outlined in 3D Solids Book One, namely the cuboctahedron, the truncated cube and the stellated octahedron. Having learnt how to draw these myself I was impressed with how little time it took for the students to replicate these models. They were much quicker than me!

To present their work students exported their images as 2D graphics, zooming in to highlight their accurate tessellations. All of them were also able to create animations of their 3D shapes.

Students spent around five hours in total working in Sketchup and around 50% of them had downloaded it at home by the end of the work. Our work in 3D was not developed as much as I would like and I hope we can have chance to focus on this more next year. I also plan to look at other ideas such as symmetry, rotation and transformation.

As a result of the module, students are able to talk more confidently about shape and can explain clearly about tessellation. I feel that using Sketchup gives the students a much clearer understanding of the concept of tessellation.

This is the third year we have used Sketchup at Kellett, but it is the first time our work has targeted an area specifically within the Mathematics curriculum. All of our previous work had been concerned with 3D design, usually around the construction of holiday apartments, or mini-cities. The shape module has been a huge success and was noted upon in our recent OfStEd inspection, which stated;

“Older pupils are treated with notable maturity: whether in (a Kellett Tell-It editorial meeting), or a ICT lesson using Google Sketch-Up to tessellate squares, activities often feel like those of a sixth form, rather than a primary school: and the children live up to these very high expectations.”

Using 3DVinci's resources allowed us to develop ideas away from the design type activities and use Sketchup to tackle specific concepts within the wider curriculum in a stimulating and visual manner. We will definitely be returning to this and developing it next year.

Here are Clive's students working on SketchUp. Such young kids, and they're getting a great handle on complex geometry.


Anyone can design anything in 3D! http://www.3dvinci.net/

Email Newsletter icon, E-mail Newsletter icon, Email List icon, E-mail List icon
Join our FREE Email Mailing List!


Monday, June 14, 2010

New Book for Woodworkers

There is a huge SketchUp following among woodworkers, and all sorts of tutorials and websites have sprung up within that community. Now there's a new book that looks like a woodworker's dream: Woodworker's Guide to SketchUp 7 by Bob Lang.


It's an e-book that comes on CD, and there are embedded videos within the text - very cool. (And something I'd love to try if I had some free time...)

Here's a review I ran across, which makes me want a copy for myself, even though I haven't done any woodworking since high school shop class...

And it looks like you can get the book for $10 off until July 1 ($29.95 instead of $39.95).


Anyone can design anything in 3D! http://www.3dvinci.net/

Email Newsletter icon, E-mail Newsletter icon, Email List icon, E-mail List icon
Join our FREE Email Mailing List!


Monday, June 7, 2010

Our June Projects

Here's what's on tap for our June SketchUp projects, going out to subscribers on June 15 (why does that date sound familiar? Oh right, it's my wedding anniversary!)

And here's something new: if you just want the three projects from the current month, you can get them without committing to a full year's subscription! Here are the details.

Cheerios Box

With a few digital photos, you can easily make a realistic-looking model of a Cheerios box (or any kind of box), using SketchUp's texture positioning. You don't even have to take your own pictures for this project; the instructions will tell you how to get the ones I took.


Cordoba Tiling

I recently got a great book that shows how to make many different Islamic tiling patterns, and this is the first example from that book. Instead of using a pen, straight, edge, and protractor, I'm using a few simple SketchUp tools. When you add in the use of components, you can make some breathtaking patterns!


Linked Chain

This project will show you how to use components to make repeated objects that interact with one another.


You know you want to subscribe.


Anyone can design anything in 3D! http://www.3dvinci.net/

Email Newsletter icon, E-mail Newsletter icon, Email List icon, E-mail List icon
Join our FREE Email Mailing List!


Thursday, June 3, 2010

Fence Illusion, Revisted

In a post last month I showed a video of an optical illusion - a fence that's not really a fence, which can be "assembled" in two different ways. I used this idea to create one of the SketchUp Projects of the Month for May.

I got the idea from a teacher named Charlie Unkeless, who recently sent me his version of the fence, which differed a bit from mine (and I like his better).

Here's the video of Charlie's fence spinning - note the "impossible" placement of the vertical fence posts:


I've placed his model in the 3D Warehouse for everyone to check out. Click the image below to get to the model's download page. Because this model has scenes, don't import it into another model - open this model in its own file. Then click the three scenes tabs across the top to see the fence spin around!


Enjoy!

Anyone can design anything in 3D! http://www.3dvinci.net/

Email Newsletter icon, E-mail Newsletter icon, Email List icon, E-mail List icon
Join our FREE Email Mailing List!