Friday, October 22, 2010

Kerkythea Project

I'm getting a jump on November's Projects of the Month, and one of the projects is about how to use the free rendering application Kerkythea (yes, strange name, but nice application).

I learned how to quickly get started from the book SketchUp 7.1 for Architectural Visualization by Robin de Jongh (see my review).

I started with this SketchUp model:


And turned on shadows, which makes the room really dark.


In Kerkythea, I defined some lights, added some reflectivity to the windows, and made the floor shiny and blue. All by using some pretty simple options. And all for free!


There are dozens of renderers out there these days, and I plan to write about many of them in the future. I started with Kerkythea because it's free, though some others are very inexpensive (and yet others are free to educators).

Have a favorite renderer? Let me know which one and why.


Anyone can design anything in 3D! http://www.3dvinci.net/

Email Newsletter icon, E-mail Newsletter icon, Email List icon, E-mail List icon
Join our FREE Email Mailing List!


Tuesday, October 19, 2010

Free SketchUp Styles

I imagine it's a very small percentage of SketchUp users who take advantage of Styles, which control how your model is displayed. A SketchUp style can control the edge color, face colors, background colors, watermarks, etc. There are a few style included in your SketchUp download, and of course you can create your own.

SketchUp Artists is a website that provides a ton of "beyond SketchUp" information, such as tutorials on rendering applications and techniques for presentation. They also have a Styles page where you can download some beautiful styles created by talented SketchUp pros around the world.

As an example, I downloaded the first style on the page ("Style 5" by Jean-Luc Clauss):


Clicking on the image on the Styles page enables you to save the style as a ZIP file. Extract the file it contains into one of the folders wtihin the Styles folder of your SketchUp installation.

In my case, I created a "JLC" folder (for Jean-Luc Clauss) inside my Styles folder.


And the "Style05.style" file was extracted into the JLC folder.

When opening SketchUp, I located the JLC folder within the main Styles collection of the Styles window:


Opening the JLC folder shows the style I placed inside.


Here's a model I downloaded, which is shown in SketchUp's default style.


Clicking the "Style5" thumbnail transforms the model into a rather stunning non-photorealistic presentation, complete with a neat Japanese-style mountain and tree in the background.


Anyone can design anything in 3D! http://www.3dvinci.net/

Email Newsletter icon, E-mail Newsletter icon, Email List icon, E-mail List icon
Join our FREE Email Mailing List!


SketchUp vs Lego James Bond

This is one of the coolest (and funniest) movies I've seen of Sketchy Physics models.


Someday, someday, someday I will learn how to do this, and write a great book showing everyone how it's done. In the meantime, I'm just blown away by people's ability and creativity!

Here's another one by the same modeler, more sinister than funny, with a Star Wars theme. A lot of stuff gets smashed and broken - awesome!


Anyone can design anything in 3D! http://www.3dvinci.net/

Email Newsletter icon, E-mail Newsletter icon, Email List icon, E-mail List icon
Join our FREE Email Mailing List!


Thursday, October 14, 2010

Round Corner Plugin

This plugin was mentioned a while back on the Official SketchUp blog, and I hope to cover it here with a bit more specificity.

First, you can get this plugin here. Note that there are TWO downloads - you need to get both. Keep the file structure, and place the files in your SketchUp / Plugins folder.

(The author is the amazing Fredo6, who has several other amazing scripts here.)

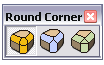
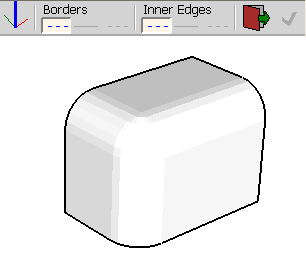
Here's the Round Corner toolbar. (If you don't see it, choose View / Toolbars / Round Corner.)


Here's how I used this plugin:

First, I only tried the Round Corner option (the first icon on the toolbar). I'm sure the other two work just as well!

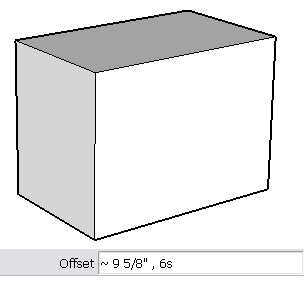
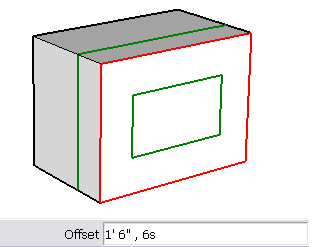
I built a basic box, and clicked Round Corner. The first thing to note is the offset distance and number of segments, which appear in the Offset field, separated by a comma. Keep in mind that high segmentation produces a smoother rounding but makes for higher file size.


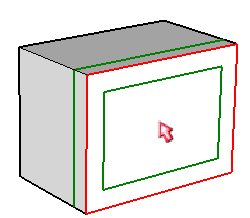
I clicked one face, and its four edges highlight in red; the red edges are the ones that will be rounded. The green lines show where the rounding will start.


I wanted a larger rounding radius, so I typed 18,6. (These numbers appeared in the Offset field as 18'-6", 6s - the "6" is for segmentation.) Now the green lines are farther from the red borders.


(As always, you never have to click in the Offset field - just type. If you enter only a number, that number will replace the offset distance and the segmentation will remain unchanged. You can also press the Tab key, which invokes a window you can use to enter these values.)

I then clicked another face, which added those edges to those edges selected for rounding.

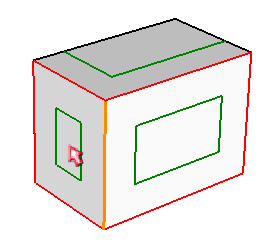
To start the rounding, just click anywhere in blank space. Here's how mine looks - there are edges everywhere because I have non-hidden edges set for both Borders and Inner Edges.


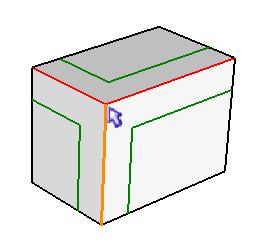
After undoing, I tried again, selecting the same two faces. This time, however, I'm unselecting the edge between the two faces (you can click a selected edge to unselect it).

Here's the result this time: the unselected edge was not rounded, the edges in the rounded portion are smoothed, and the border edges are unhidden.


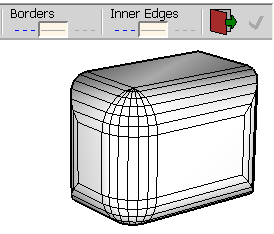
One last time: this time I clicked a vertex to select all edges that end there.

And here are the results with all edges softened:


Here's another example of something you'd want to make round and not sharp edges: a chair. It's created as a set of components: two identical components for the armrests, one component for the body. (If you want to try this, you can download my very sophisticated model here.)


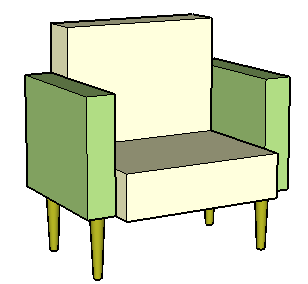
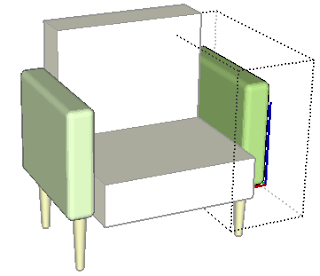
For the armrests, I first opened one of them for editing, then used Round Corner on all its edges. (An easy way to select all edges is to double-click on a face - this selects all contiguous faces.)

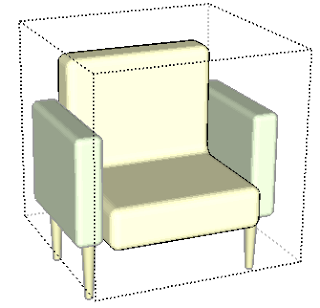
Then I did the same for the body.


Here's how you'd use Round Corner on 3D Text: you would either edit or explode the 3D text component, activate Round Corner, and click the top face of each letter:

With this very cool result:


Round Corner is great for adding drafts to mechanical parts. For the model shown below, I want to round the corner between the magenta and yellow obects. So I clicked the top yellow face to select all of its edges . . .


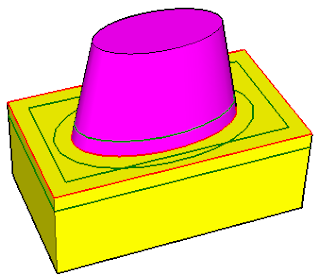
. . . then I clicked each outer edge of the yellow face, to unselect them.

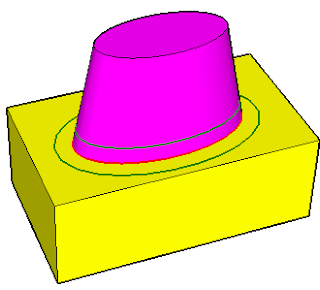
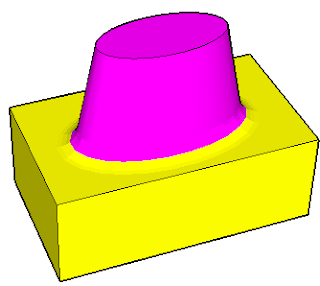
Here's the result - excellent! This would be rather annoying to complete with the Follow Me tool.

This plugin has numerous other options, and all documentation is included. Just go to the main SketchUp main and choose Tools / Fredo6 Collection /Round Corner / Documentation. You'll also find a helpful video, plus a link to donate to support Fredo6. (If this tool ends up saving you hours of modeling time, please toss Fredo6 a few bucks so he can keep writing this stuff!)


Anyone can design anything in 3D! http://www.3dvinci.net/

Email Newsletter icon, E-mail Newsletter icon, Email List icon, E-mail List icon
Join our FREE Email Mailing List!


Wednesday, October 13, 2010

SketchUp in Amharic

Recently I had three wonderful visitors to my house: the Abebe family, shown below.


Left to right are Abanezer, Zelalem (the dad), and Robel. (Mom was working.) The Abebes moved to the DC area a few years from Ethiopia, and have lost no time learning all they can about computers and design.

Robel and Abanezer worked with my friend Phil Shapiro who works as the "Public Geek" at the library in Takoma Park, Maryland (in addition to his teaching work and other mentoring projects). Phil introduced the boys to SketchUp (as well as Inkscape), and once they got comfortable in SketchUp, they created a YouTube screencast in Amharic, showing how to create a house.


Not fluent in Amharic? Don't worry, here's the English version:


The screencasts were created using Screenflow, a screencasting program for the Mac.

These are super-nice kids, and I look forward to staying in touch with them and seeing how their education and careers progress. As a bonus, I also got a quick lesson in written and spoken Amharic, which is a beautiful-sounding language.


Anyone can design anything in 3D! http://www.3dvinci.net/

Email Newsletter icon, E-mail Newsletter icon, Email List icon, E-mail List icon
Join our FREE Email Mailing List!


October Math Forum Project: Pentaflake

I just posted this month's Math Forum project: The Pentaflake. This is a 2D fractal created from just one simple pentagon. The only SketchUp tools needed to complete the pentaflake are Rotate and Erase - simple and elegant.

When you fill in the missing spaces with faces, you can get some beautiful patterns:

As usual, there is a Student Version which includes a few questions, and a Teacher Version that provides the answers.

It's free - check it out!

PS - I ran across the pentaflake while creating the hexaflake shown below, which is the topic of one of this month's Projects of the Month.


Anyone can design anything in 3D! http://www.3dvinci.net/

Email Newsletter icon, E-mail Newsletter icon, Email List icon, E-mail List icon
Join our FREE Email Mailing List!


Thursday, October 7, 2010

What's Coming in Our October Projects?

Next Friday, October 15, here's what subscribers to our Projects of the Month will be getting:

Nearby Models

This project details one of the new features of SketchUp 8. You can bring in a patch of land from Google Earth (without actually opening Google Earth), and then populate that land with 3D Warehouse models that are located nearby. No more back-and-forth between Earth, Warehouse, and SketchUp!


Dice

Learn how to start with a simple cube and add guide lines and "dot" components to make a die (the singular of dice). As a bonus you'll also see how to use a free plug-in to make rounded edges and corners!


Hexaflake

This 2D fractal is created by copying hexagons (or groups of hexagons) into a pattern of seven hexagons (or groups of hexagons).


Sign up for Projects of the Month - still just $36 gets you 3 projects per month for 12 months!


Anyone can design anything in 3D! http://www.3dvinci.net/

Email Newsletter icon, E-mail Newsletter icon, Email List icon, E-mail List icon
Join our FREE Email Mailing List!