Thursday, May 31, 2012

We Got Mail!

A few years ago I created this video describing the Hirschhorn Tile:


This beautiful tiling is one of the subjects (and the cover model!) of one of my GeomeTricks Aperiodic Patterns books:

Well, guess who found this video and got in touch with me? The very person who discovered this tile: Michael Hirschhorn! Call me a geometry geek, but that would be like Justin Bieber emailing my 8-year old daughter :-)

We've already had lots of back-and-forths, but here's a snippet of what he wrote about the background of how he got to this tiling:
Back in the early 1970's, the Faculty of Science here [in Sydney, Australia] set up a program by which kids from (what we call) high school in their second-last year (so aged 16 or 17 or so) were invited to apply to spend a week near the end of their school year (November) involved in a variety of projects (in Physics, Chemistry, Math, Biological Science, .. ) in groups of about six, led by an academic. (About 120 students were involved each year.) In 1974, Professor George Szekeres led a group on the (very optimistic) task of finding all pentagons that tile the plane (a problem, incidentally, which is not known to be completely solved even today.) I was a young and junior member of staff (27), and looked in at what they were doing. They very quickly (within a day or two) restricted their goal to finding all equilateral, convex pentagons that tile the plane.
The group found a cosine rule that holds in an equilateral convex pentagon. At about the same time, I noticed that in every tiling we knew, the angles came together as follows A+B+C=360 degrees twice for every vertex where 2D+2E=360 degrees. (Each angle occurs twice in such an arrangement, and 2A+2B+2C+2D+2E=1080 degrees =3 times 360 degrees.) I suggested that there may be a tiling in which  2A+B+C=360 degrees, B+2D=360 degrees and C+2E=360 degrees. The Professor took home these relations and our cosine rule, and with considerable amount of work (by hand) found the solution,  A=60, B=160, C=80, D=100, E=140 degrees. He brought in his solution the next day, we cut out many such pentagons, and discovered it really did tile the way I proposed! Four such pentagons together form shapes like little penguins that march across the plane in rows, and the rows fill the plane. And that is essentially where our discoveries ended. The students then wrote up the week's work, and presented it to a large audience on the Friday night. After that, on my way home in the car, I had the thought, "What happens if we put six of the 60 degree angles together?" And by the time I reached home, I suspected that I could continue the tiling to cover the plane. So I got out my 20 or so pentagons, and, lo and behold, it worked! 
 
Mike also showed me a Hirschhorn tessellation that I hadn't covered in my book:

And he also described an irregular, equilateral pentagon tiling that tiles just like the 9-sided "Bent Wedge" covered in the same book:


Even if you aren't into geometry, you gotta admit that these are some pretty pictures!


Anyone can design anything in 3D! http://www.3dvinci.net/

Email Newsletter icon, E-mail Newsletter icon, Email List icon, E-mail List icon
Join our FREE Email Mailing List!


Check out Tinkercad

Looking to explore something new in 3D design over the summer?

So... during this period between the announcement of the SketchUp sale from Google to Trimble to the date when the sale closes, I've had some time to look into some other design apps I've been hearing about. And yesterday I spent a while poking around with Tinkercad, which is great fun.

IMO, there are two main great things about Tinkercad - it's easy to use (and FREE!), which is great for those who find SketchUp overwhelming (such as kids in elementary school), and whatever you design can be easily sent to a 3D printer, like MakerBot. How cool is it for a kid to design a little robot and then get to actually hold it in hand? (Of course, you don't have to print anything, it's also fun just to design stuff!)

Here are a few interesting models I found on their "things" page:   
Here's a 3D birthday card which was printed:


I hate to compare Tinkercad to SketchUp - they are both 3D modelers but with different focuses. But here's my comparison anyway:
  • SketchUp is certainly more robust, can be scaled to any size project (tiny mechanical parts to entire building complexes), and the design features enable much more detailed modeling.
  • Tinkercad provides fewer tools but they are quite easy to use: drag in some primitive shapes, make some easy changes, add decorations, holes, etc. The printing export is simple, and if you don't have access to a 3D printer, you can send your model to one of Tinkercad's partners to have your model printed and sent to you.
Tinkercad is web-based, so nothing to install. It operates on WebGL, so they recommend using Firefox or Chrome. (However, for me it didn't work on Firefox but worked fine in IE, not sure why!) You need an account (also free) to save whatever models you create.

To get started with Tinkercad, their very fun website has Lessons - short, guided, tutorial projects that walk you through the 8 or 10 steps to create something. 

I think 3D printing is the way of the future, with more and more of these machines popping up in schools, libraries, and labs. It's becoming way more fun to be a kid these days! If the 10-year old me had been able to model and design my own toys (a large number of years ago), I wonder what sorts of things would have piled up in my basement....

Anyone can design anything in 3D! http://www.3dvinci.net/

Email Newsletter icon, E-mail Newsletter icon, Email List icon, E-mail List icon
Join our FREE Email Mailing List!


Tuesday, May 8, 2012

What's Coming in Our May Projects?

This is both a fun and practical month for subscribers to our Projects of the Month. The practical includes a project that shows how to replace a lot of components at once (not to say that's not also fun), and the other two projects deal with zombies. But you can be a zombie-hater and still enjoy these projects - they show how to create faces for the faceless, and how to make your characters speak to one another.

Zombies!
There are plenty of people in the 3D Warehouse you can use to populate your models. Google has provided many generic, 2D "cardboard cutout" people that are great to use because they have low file size, and always face you - giving the illusion of 3D without using a huge 3D model. But many of these people have no faces:


This project shows how to add faces to the faceless. (You don't have to make zombies, unless you're trying to get the attention of 10-year old boys.)


Zombie Chat
Once you have your zombies (or whatever creatures you decide to make), this project shows how to use the Text tool and layers to create a chat between your two, well, whatever characters they are. Play the quick movie below: 


Replacing Components
In this project you start with a set of identical windows, and add a flower box to just one of the windows:


Then you replace all of the flower-less windows at once, with the one that has flowers:
These are fun projects to get students interested in something other than the approaching summer vacations! Subscribe here.

Anyone can design anything in 3D! http://www.3dvinci.net/

Email Newsletter icon, E-mail Newsletter icon, Email List icon, E-mail List icon
Join our FREE Email Mailing List!


Zombie Chat

The kids in my SketchUp class have gotten into downloading the various people available in the 3D Warehouse. It's best to look for the 2D people (and animals and trees, etc.) because they have miniscule file sizes compared to the much more complex 3D people. And if created correctly, these 2D "cardboard cutout" people will always face you, no matter where you orbit the model. This gives the impression of 3D, while keeping your models moving fast.

But a lot of the Google-supplied 2D people are faceless - meant to be used to generically populate SketchUp designs.
 

So I showed the kids how to not only add faces and accessories, but also how to create a short movie that includes a dialog.
Both of these topics are included in the Projects of the Month, going out next week.


Anyone can design anything in 3D! http://www.3dvinci.net/

Email Newsletter icon, E-mail Newsletter icon, Email List icon, E-mail List icon
Join our FREE Email Mailing List!


Monday, April 30, 2012

Test Drive of SightSpace for iPad

So I finally broke down and got an iPad. Or let me rephrase - I finally got a second-hand iPad 1. I'm having a great time with it, and while it's mostly been a productivity killer (I'm getting addicted to DrawSome and jigsaw puzzle apps), I did try something work-related.

Last year I read about SightSpace 3D on the official SketchUp blog. It's not free ($15), but the nice people at Limitless Computing gave a free evaluation copy.

SketchUp doesn't work as a modeling tool on the iPad, at least not yet. So while you can't build or change models, SightSpace enables you to view them. This would make the job of an interior designer or contractor a good bit easier - carrying out a lightweight tablet on the job while "taking a spin" around the proposed design.

SightSpace works on the iPad, iPhone, and Kindle Fire. I didn't try it on my Fire or iPhone - I wanted the big-screen look! 

One thing to note is that SightSpace reads only KMZ files - the native format for Google Earth. Models that are geolocated are uploaded to the 3D Warehouse automatically as KMZ files, but you can save any SketchUp model as KMZ, using the File / Export menu.

SightSpace can read KMZ files from the 3D Warehouse, or models stored on the iPad itself, or models emailed or in DropBox. For my test I downloaded a 3D Warehouse model of the furnished house from "The Simpsons" TV show, saved it as a KMZ on my own computer, and uploaded it to the 3D Warehouse. (To upload a KMZ file into the Warehouse, use the "Upload" link at the top right corner of the 3D Warehouse landing page.)

With SightSpace open, I clicked "Load" and found my model:

(Models that appear in the 3D Warehouse with a "view in Google Earth" link will appear in SightSpace as "View in SightSpace 3D.)

This is how the house appears in SightSpace. Pretty cool! You can orbit by dragging one finger, pan by dragging two fingers, and zooming (as you might guess) is done with the two-finger "pinching" or "spreading" movement.
 If you're an interior designer, you want to get right into the house and look around. So you zoom in to approach a wall or window . . .

 . . . and keep zooming till you're inside.
Orbit is the default set of motions, but you can also use the "Look Around" tool similar to the one in SketchUp itself. 
 Using Look Around means dragging with one finger to simulate turning the head, or looking up or down. Two-finger dragging simulates walking side to side.

Until you get used to the movements needed to get to the view you want, you might find yourself zoomed in too closely to a wall or couch, hard to make your way out to a familiar spot. So a double-tap is like Zoom Extents, very useful!

The bookmark icon at the top enables you to save a view. This is another great way to set orientation points. You can open your list of bookmarks via the large bookmark icon at the bottom of the app. The camera icon at the top enables you to save a view as a photo in your iPad's photo library, easy to email. And the "i" icon opens the Help.

One thing I didn't get to try is the Augmented Reality - this only works on the iPad 2 and 3. This enables you to situate your model within real Google Earth terrain. If your model isn't geolocated you wouldn't need this, but if your project is a shopping mall or museum, it's invaluable to view it in its "natural habitat."

For design pros, the $15 seems like a great deal - you will find yourself using SightSpace pretty often, and wowing your clients. If you're a teacher or professor looking to evaluate SightSpace, you can get a free evaluation copy to see if it'll work for your lesson plans. As more schools become iPad-friendly, I envision seeing SightSpace making inroads with students who will LOVE it.


Email Newsletter icon, E-mail Newsletter icon, Email List icon, E-mail List icon

Join our FREE Email Mailing List!


Friday, April 27, 2012

Cool Sketchy Physics Model, by a 7th Grader

A few weeks ago I received a neat model from Toronto Middle School teacher, and SketchUp enthusiast, Geoffrey Winship. It has a gear box that raises and lowers three fun Pac-Man characters. I made a little recording of how I played with it, including speeding up and slowing down the various motors.


Middle school kids building simple motors and gears to make a fun machine - if they had this when I was in school I imagine a lot of us might have ended up on different carer paths!
Here's what Geoffrey wrote about this project:
In the Toronto District School Board, at Essex Public School, design and technology is alive and well in Mr. Winship's Science class. Each year, students in grade seven learn about building models using wheels, axles, and cams. Students design the model and then actually build it using saws, drill presses and other power tools and hand tools. The general problem is to design a child's toy that turns rotary motion into linear motion. Each student is also required to hand-draw the model showing orthographic and isometric views. For this project, students could also produce a supplementary set of sketches using Google SketchUp. Bonus marks were given to students who could use animation to drive the model. This model was designed by a grade seven student who was introduced to SketchUp for the first time this year. Grade seven and eight students are given lessons in 2D and 3D drawing using SketchUp and given opportunities to develop their skills. The first time he used SketchUp, this student produced drawings of a vehicle that he built in the shop. This is the second model made by this student, his first using Sketchy Physics, and is an accurate representation of the real cam toy.


Email Newsletter icon, E-mail Newsletter icon, Email List icon, E-mail List icon

Join our FREE Email Mailing List!


Monday, April 23, 2012

An Open-Source Mind

I like this recent piece by my friend and tech blogger, Phil Shapiro. As a mom I've seen how my own kids bend rules, or make their own rules, by collaborating and compromising, sometime peacefully, more often after fighting. But this is how we learn to think outside the box! http://opensource.com/life/12/4/day-my-mind-became-open-sourced

Anyone can design anything in 3D! http://www.3dvinci.net/

Email Newsletter icon, E-mail Newsletter icon, Email List icon, E-mail List icon
Join our FREE Email Mailing List!


Monday, April 9, 2012

What's Coming in our April Projects?

I'm really excited about this month's Projects of the Month!  I'm introducing my new favorite SketchUp plugin: Sketchy Physics (which is free), and also including a project involving Google Earth.

I want to get lots of you to try Sketchy Physics, so the subscription is ON SALE this month - for just $20 you get a full year of projects, 3 per month! (Normal price: $36.)

Sketchy Physics Domino Run

This fun project shows you how to create a basic domino run, using Sketchy Physics to define the play table and each domino. Set them up, then drag the first domino into the second one to start the run.

I used the method from this project to create a longer, fancier run - check out the video below to see it in action! 


Waterfall House 
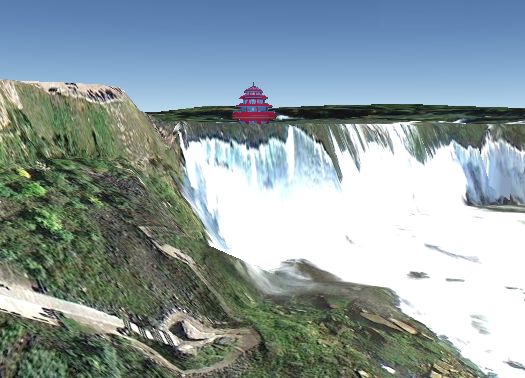
It's been a while since I wrote up something on the interaction between SketchUp and Google Earth. The UI in SketchUp 8 is a bit different than in previous versions, so this project shows how to find the exact spot you want your model, get that spot imported into SketchUp, and place your model on it. This particular house sits atop a waterfall, so you'll also have to make sure you're getting the right elevation on the terrain.


Sierpinsky Triangle
This particular fractal is famous in 2D, and this project shows how to create it in 3D, starting by copying a single tetrahedron into a 4-tetrahedron pyramid.

By using nested components, aided by the Outliner (SketchUp's very handy but little-used component organizer), you can easily grow from one pyramid into many, and even add some artistic embellishment!
You don't want to miss out on this set! Sign up for Projects of the Month, at the special April sale price of $20!


Anyone can design anything in 3D! http://www.3dvinci.net/

Email Newsletter icon, E-mail Newsletter icon, Email List icon, E-mail List icon
Join our FREE Email Mailing List!


Monday, April 2, 2012

Spring Specials: Two Great Deals!

For the month of April, we have specials on two of our items -you don't want to miss these!

GeomeTricks 13-Book Set (PDF) - Over Half Off at $49.95!

Normally priced at $109.95, this 785-page set of SketchUp project books is not just for math lovers! You'll make mosaics, round and spiral patterns, fractals, amazing 3D solids, and much more, learning and using crucial geometric concepts including symmetry, tessellation, scaling, and duality.


This set comes as a single, printable PDF - no locking or licensing.

and....

SketchUp Projects of the Month - Just $20!

Reduced from $36, this subscription includes 12 months of projects, three projects going out each month. Every design topic under the sun is covered, including reader requests! The April projects introduce Sketchy Physics with a fun domino run - you'll become addicted just like I am!


Another April project combines SketchUp and Google Earth to place a house above a waterfall.


Don't let these deals pass you by!

GeomeTricks 13-Book Set (PDF) for $49.95
SketchUp Projects of the Month for $20


Anyone can design anything in 3D! http://www.3dvinci.net/

Email Newsletter icon, E-mail Newsletter icon, Email List icon, E-mail List icon
Join our FREE Email Mailing List!


Thursday, March 29, 2012

I LOVE Sketchy Physics

As many of my readers know, I've been looking at Sketchy Physics from afar for a while now. This week I started getting into it in earnest, and I have found a new obsession.

Sketchy Physics is a free plugin (download it here), which has been around for a few years now but isn't very widely used - there is precious little info out there to help one learn it. Plus it's a little clunky and not entirely intuitive. But if you go on YouTube and search for "sketchy physics" you'll see some amazing models, so I'm guessing all of those very smart modelers were self-taught.

Yesterday I played around with some basic shapes, and built a really fun domino run. Here is the set up:


You knock over the first domino, and they start to fall:


Here's how they look when it's all done:


And you can keep going, throwing the rest of the dominoes around, even off their table and into the infinite abyss below:

Check out the video. It's fun flinging things around and seeing them bang into each other. I let each of my kids have a go and they were also thrilled.


I've written up the steps for this project, which will be available as part of next month's Projects of the Month, going out to subscribers on April 15. I really want people to get into this awesome plugin, so I'm running a special on the subscription - instead of the usual $36 for the year, from now till the end of April you can sign up for just $20.

I'm also planning a Sketchy Physics project book, and soon I'll be sending out feelers to see who's interested. You'll get hooked like I am!


Anyone can design anything in 3D! http://www.3dvinci.net/

Email Newsletter icon, E-mail Newsletter icon, Email List icon, E-mail List icon
Join our FREE Email Mailing List!